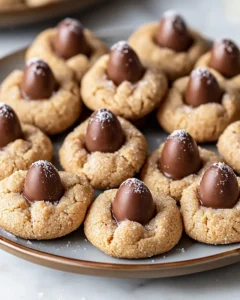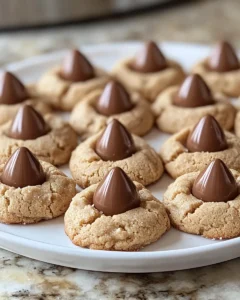
There’s something irresistibly nostalgic about Peanut Butter Blossom Cookies — those soft, chewy peanut butter rounds crowned with a chocolate kiss. These cookies aren’t just treats; they’re a piece of Americana, a bite-sized reminder of holidays, bake sales, and cozy afternoons spent in the kitchen. Whether you’re preparing for Christmas cookie exchanges, filling a dessert tray for a party, or simply craving a classic homemade sweet, these Bakery-Style Peanut Butter Blossoms deliver perfection in every bite.
This recipe was inspired by the timeless cookies many of us grew up making with family. The combination of creamy peanut butter and rich chocolate is pure comfort, and the slightly crisp edges paired with a soft, melt-in-your-mouth center make them irresistible. They’re the kind of cookies that look as beautiful as they taste — golden, glossy, and perfectly topped with a chocolate kiss. Once you bake a batch, you’ll understand why they’ve remained a bakery and household favorite for generations.
Ingredients
-
1 3/4 cups all-purpose flour
-
1 teaspoon baking soda
-
1/2 teaspoon salt
-
1/2 cup unsalted butter, softened
-
1/2 cup granulated sugar
-
1/2 cup packed brown sugar
-
1/2 cup creamy peanut butter
-
1 large egg
-
2 teaspoons pure vanilla extract
-
Extra granulated sugar (for rolling)
-
About 36 milk chocolate kisses, unwrapped
Directions
-
Preheat and Prepare:
Preheat your oven to 375°F (190°C). Line your baking sheets with parchment paper or silicone mats to prevent sticking. -
Mix Dry Ingredients:
In a medium bowl, whisk together the flour, baking soda, and salt. Set aside. -
Cream Butter and Sugars:
In a large mixing bowl, use a hand or stand mixer to cream together the softened butter, granulated sugar, and brown sugar until the mixture is light and fluffy — about 2 to 3 minutes. -
Add Peanut Butter and Wet Ingredients:
Beat in the peanut butter until fully incorporated, followed by the egg and vanilla extract. Scrape down the sides of the bowl as needed to ensure everything mixes evenly. -
Combine Dry and Wet Mixtures:
Gradually add the dry ingredients to the wet mixture, stirring until a soft, slightly sticky dough forms. Avoid overmixing — this keeps your cookies soft and tender. -
Shape and Coat:
Scoop about 1 tablespoon of dough per cookie and roll it into smooth balls. Roll each ball in granulated sugar until fully coated, then place them about 2 inches apart on the prepared baking sheets. -
Bake to Perfection:
Bake for 8 to 10 minutes, or until the edges are just set and the tops begin to crack slightly. The cookies should still look soft in the center — they’ll firm up as they cool. -
Add the Chocolate Kiss:
Immediately after removing the cookies from the oven, press a chocolate kiss into the center of each one. The cookie will crack slightly around the edges, giving that iconic “blossom” look. -
Cool and Set:
Allow the cookies to cool on the baking sheet for 5 minutes before transferring them to a wire rack. Let them cool completely so the chocolate sets firmly.
Prep Time
15 minutes
Cook Time
10 minutes
Total Time
25 minutes
Yield
About 36 cookies
Notes
-
Peanut Butter Choice: Creamy peanut butter creates that bakery-style smooth texture. Avoid natural peanut butter with separated oils; it can make the dough too crumbly.
-
Chocolate Alternatives: While classic milk chocolate kisses are traditional, you can experiment with dark chocolate, caramel-filled, or white chocolate varieties for fun twists.
-
Make-Ahead Tip: The dough can be chilled for up to 48 hours before baking. Simply cover it tightly and refrigerate, then let it sit at room temperature for 20 minutes before shaping.
-
Freezing: You can freeze baked cookies or unbaked dough balls. For baked cookies, freeze in layers separated by parchment paper. For unbaked dough balls, freeze on a tray, then transfer to a freezer bag — bake straight from frozen, adding an extra minute or two to the bake time.
The Secret to Perfect Bakery-Style Texture
The hallmark of bakery-style peanut butter blossoms is their texture — slightly crisp edges with a soft, chewy center that melts in your mouth. Achieving this balance comes down to three key steps:
-
Creaming the Butter and Sugars Thoroughly: This step introduces air into the dough, ensuring the cookies bake up soft and tender rather than dense.
-
Avoiding Overbaking: Pulling them out just as the tops start to crack keeps the interior moist and chewy.
-
Using the Right Peanut Butter: Regular creamy peanut butter (like Jif or Skippy) gives the best structure and flavor. Natural varieties tend to produce crumbly cookies that don’t hold their shape.
For that “fresh from the bakery” look, roll your dough balls evenly, coat them well in sugar, and press the chocolate kiss gently in the center immediately after baking. The warmth helps the chocolate adhere perfectly without melting completely.
A Bit of History Behind Peanut Butter Blossoms
Peanut Butter Blossoms first made their debut in the 1957 Pillsbury Bake-Off, created by Freda Smith from Ohio. Originally called “Black-Eyed Susans,” these cookies quickly gained fame for their unique blend of peanut butter and chocolate — two flavors that were rarely combined in cookies at the time.
By the 1960s, they had become a household favorite, particularly during the holiday season. Their signature design — a golden peanut butter cookie topped with a chocolate kiss — made them both beautiful and easy to recognize on any cookie platter. Today, they remain a cherished part of American baking tradition, enjoyed by generations who appreciate their nostalgic charm.
Why You’ll Love This Recipe
-
Classic Flavor: The rich, nutty base perfectly complements the sweetness of the chocolate.
-
Bakery-Style Finish: These cookies have that perfect round shape, sparkling sugar coating, and soft-baked texture.
-
Easy to Make: With simple pantry ingredients and straightforward steps, even beginner bakers can master this recipe.
-
Versatile: Perfect for holidays, bake sales, gift boxes, or an afternoon pick-me-up with a cup of coffee.
-
Crowd-Pleasing: Loved by kids and adults alike, they never last long on a cookie tray.
Pro Tips for the Best Peanut Butter Blossoms
-
Use Room Temperature Ingredients: Butter, egg, and peanut butter should all be at room temperature for smooth blending.
-
Chill the Dough (Optional): If your dough feels too soft or sticky, refrigerate it for 20–30 minutes before rolling. This helps the cookies maintain their shape.
-
Don’t Overcrowd the Pan: Leave enough space between cookies — they spread slightly as they bake.
-
Timing Is Key: Press the chocolate kiss in right after baking. Waiting too long means the cookie surface won’t be soft enough to hold the chocolate securely.
-
Let the Chocolate Set: Allow the cookies to cool completely before storing to prevent the chocolate from smudging.
Variations to Try
-
Chocolate Lover’s Twist: Add 2 tablespoons of unsweetened cocoa powder to the dough for a double-chocolate version.
-
Crunchy Peanut Version: Use crunchy peanut butter for extra texture and a more rustic appearance.
-
Mini Blossoms: Use a teaspoon of dough per cookie and mini chocolate kisses for bite-sized treats — perfect for party platters.
-
Festive Coating: Roll dough balls in colored sugar (red and green for Christmas, pastel for Easter) for a fun seasonal touch.
-
Peanut Butter Cup Blossoms: Swap the chocolate kisses for mini peanut butter cups for an even richer flavor experience.
How to Store Peanut Butter Blossoms
Room Temperature:
Store cookies in an airtight container for up to 5 days. Place parchment paper between layers to prevent them from sticking.
Freezer Storage:
Once cooled completely, layer cookies in a freezer-safe container or bag. Freeze for up to 3 months. Thaw at room temperature for about 20 minutes before serving.
Make-Ahead Dough:
You can prepare the dough in advance and refrigerate it for up to 2 days or freeze it for up to a month. Shape the dough into balls before freezing for easy portioning later.
Serving Suggestions
-
Holiday Cookie Trays: Add color by mixing these blossoms with sugar cookies, chocolate crinkles, and snickerdoodles.
-
Dessert Boards: Pair with fresh fruit, brownies, and caramel drizzle for a stunning dessert display.
-
Gift Giving: Wrap a dozen cookies in a decorative tin or clear cellophane bag tied with ribbon — a thoughtful, homemade gift that never fails to impress.
-
With Coffee or Milk: Nothing beats a warm peanut butter blossom alongside a glass of cold milk or a hot cup of coffee.
Troubleshooting Common Issues
-
Cookies Spreading Too Much: The dough may be too warm. Chill it for 20 minutes before baking.
-
Dry or Crumbly Cookies: Overbaking or using natural peanut butter can cause dryness. Stick with creamy peanut butter and pull cookies early.
-
Chocolate Kiss Falling Off: Press the kiss into the cookie immediately after baking and allow the cookies to cool undisturbed until set.
-
Uneven Baking: Always bake one sheet at a time in the center of the oven for consistent results.
Why Homemade Beats Store-Bought Every Time
There’s simply no comparison between homemade and packaged cookies. Homemade Peanut Butter Blossoms have a freshness, softness, and rich peanut flavor that mass-produced cookies can’t match. You control every ingredient, ensuring there are no unnecessary preservatives or artificial flavors. Plus, the joy of baking — the aroma filling your kitchen, the anticipation as they cool, and the satisfaction of that first bite — adds something special to every batch.
Homemade cookies also allow for creativity. You can personalize them to your taste, experiment with different chocolates, or even make them in festive shapes. The process becomes just as rewarding as the result.
Bringing Family and Friends Together
Baking Peanut Butter Blossoms is more than a culinary task — it’s a tradition that brings people together. Whether you’re teaching kids how to roll the dough, laughing with loved ones while unwrapping chocolate kisses, or simply sharing cookies over coffee, each step builds memories. These cookies have a way of sparking joy and nostalgia, turning any ordinary afternoon into something special.
So the next time you want to bake something that feels both familiar and impressive, reach for this Bakery-Style Peanut Butter Blossom Cookie recipe. They’re simple, satisfying, and guaranteed to bring smiles — just like the ones from your favorite hometown bakery.
Frequently Asked Questions (FAQs)
1. Can I make Peanut Butter Blossom Cookies ahead of time?
Yes! You can prepare the dough up to two days in advance and store it in the refrigerator. When you’re ready to bake, let the dough sit at room temperature for about 20 minutes before rolling into balls. You can also freeze the unbaked dough balls for up to three months — just bake straight from frozen, adding an extra minute or two to the baking time.
2. Why did my Peanut Butter Blossoms turn out dry?
Dry cookies often result from overbaking or using natural peanut butter. Stick with creamy, shelf-stable peanut butter and bake only until the edges are set — the centers should still look slightly soft. They’ll firm up as they cool.
3. How do I keep the chocolate kiss from melting or sliding off?
Press the chocolate kiss gently into each cookie immediately after baking. Then, let the cookies cool completely on a wire rack. This allows the chocolate to set without melting or shifting.
4. Can I use other types of chocolate instead of kisses?
Absolutely! You can top the cookies with dark chocolate kisses, caramel-filled chocolates, or mini peanut butter cups for fun flavor variations while keeping the classic look.
Peanut Butter Blossom Cookies Recipe
- Total Time: 25 minutes
- Yield: About 36 cookies 1x
Description
There’s nothing quite like biting into a soft, chewy peanut butter cookie crowned with a smooth chocolate kiss. These Bakery-Style Peanut Butter Blossoms are the perfect mix of sweet and nutty, with that melt-in-your-mouth texture that feels straight from a professional bakery. Ideal for holidays, parties, or everyday baking, these cookies are simple to make, beautifully golden, and sure to impress anyone who takes a bite.
Ingredients
-
1 3/4 cups all-purpose flour
-
1 teaspoon baking soda
-
1/2 teaspoon salt
-
1/2 cup unsalted butter, softened
-
1/2 cup granulated sugar
-
1/2 cup packed brown sugar
-
1/2 cup creamy peanut butter
-
1 large egg
-
2 teaspoons pure vanilla extract
-
Extra granulated sugar, for rolling
-
About 36 milk chocolate kisses, unwrapped
Instructions
-
Preheat oven to 375°F (190°C) and line baking sheets with parchment paper.
-
In a bowl, whisk together flour, baking soda, and salt; set aside.
-
In a large mixing bowl, cream butter, granulated sugar, and brown sugar until light and fluffy.
-
Beat in peanut butter, then add the egg and vanilla extract until smooth.
-
Gradually add dry ingredients to the wet mixture, mixing until just combined.
-
Roll 1 tablespoon of dough into balls, coat in sugar, and place 2 inches apart on baking sheets.
-
Bake for 8–10 minutes or until edges are set and tops begin to crack.
-
Immediately press a chocolate kiss into the center of each cookie.
-
Let cool on baking sheet for 5 minutes, then transfer to a wire rack to cool completely.
Notes
-
Preheat oven to 375°F (190°C) and line baking sheets with parchment paper.
-
In a bowl, whisk together flour, baking soda, and salt; set aside.
-
In a large mixing bowl, cream butter, granulated sugar, and brown sugar until light and fluffy.
-
Beat in peanut butter, then add the egg and vanilla extract until smooth.
-
Gradually add dry ingredients to the wet mixture, mixing until just combined.
-
Roll 1 tablespoon of dough into balls, coat in sugar, and place 2 inches apart on baking sheets.
-
Bake for 8–10 minutes or until edges are set and tops begin to crack.
-
Immediately press a chocolate kiss into the center of each cookie.
-
Let cool on baking sheet for 5 minutes, then transfer to a wire rack to cool completely.
- Prep Time: 15 minutes
- Cook Time: 10 minutes


