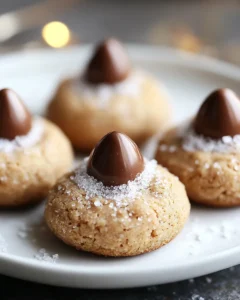
There’s something undeniably nostalgic about the sweet aroma of peanut butter cookies baking in the oven, especially when topped with a warm chocolate kiss. These Melt-in-Your-Mouth Peanut Butter Blossoms are the kind of cookies that make everyone stop in their tracks—soft, chewy, and filled with that irresistible peanut butter flavor we all know and love.
Perfect for holiday cookie exchanges, bake sales, or cozy weekend baking, this classic treat has been a staple in American kitchens for generations. They’re a reminder of simpler times—of baking with grandma, sneaking bites of dough, and watching that iconic chocolate kiss melt slightly into the golden cookie. Whether you’re making them for Christmas, a family gathering, or simply to treat yourself, these cookies are guaranteed to spark smiles and sweet memories.
Ingredients
-
1/2 cup unsalted butter, softened
-
1/2 cup creamy peanut butter
-
1/2 cup granulated sugar
-
1/2 cup packed brown sugar
-
1 large egg
-
1 teaspoon vanilla extract
-
1 3/4 cups all-purpose flour
-
1 teaspoon baking soda
-
1/2 teaspoon baking powder
-
1/4 teaspoon salt
-
Extra granulated sugar for rolling
-
About 36 milk chocolate kisses, unwrapped
Directions
-
Preheat the oven.
Set your oven to 375°F (190°C). Line two baking sheets with parchment paper or silicone baking mats to ensure even baking and easy cleanup. -
Cream the butter and sugars.
In a large mixing bowl, beat together the butter, peanut butter, granulated sugar, and brown sugar until the mixture is light and fluffy. This step is key to creating that soft, melt-in-your-mouth texture. -
Add the egg and vanilla.
Mix in the egg and vanilla extract until fully incorporated. The dough should be smooth and creamy at this stage. -
Combine the dry ingredients.
In a separate bowl, whisk together the flour, baking soda, baking powder, and salt. Slowly add this dry mixture to the wet ingredients, mixing until just combined. Avoid overmixing, as this can make the cookies tough. -
Shape the cookies.
Scoop about one tablespoon of dough per cookie, then roll each piece into a ball. Roll the balls in granulated sugar to give them that signature sparkle and crunch. -
Bake to perfection.
Place the cookie dough balls onto the prepared baking sheets, leaving about two inches of space between each one. Bake for 8–10 minutes, or until the edges are lightly golden and the tops are slightly cracked. -
Add the chocolate kiss.
Immediately after removing the cookies from the oven, press one chocolate kiss into the center of each warm cookie. The edges will crack slightly as the chocolate settles—this is exactly what you want. -
Cool and enjoy.
Let the cookies rest on the baking sheet for about 5 minutes before transferring them to a wire rack to cool completely. Once cooled, the chocolate will set, creating the perfect balance of soft cookie and creamy chocolate.
Prep Time
15 minutes
Cook Time
10 minutes
Total Time
25 minutes
Yield
About 3 dozen cookies
The Secret to That “Melt-in-Your-Mouth” Texture
What makes these Peanut Butter Blossoms so special isn’t just the combination of peanut butter and chocolate—it’s the soft, tender crumb that practically melts on your tongue. The secret lies in creaming the butter and sugars together thoroughly. This step traps air in the dough, ensuring each cookie bakes up fluffy and light.
Using a mix of brown sugar and granulated sugar also adds depth. The brown sugar’s moisture keeps the cookies chewy, while granulated sugar adds crisp edges. When these two sugars come together with creamy peanut butter, the result is a soft and flavorful cookie that stays fresh for days.
Tips for Perfect Peanut Butter Blossoms
-
Use room temperature ingredients.
Soft butter and peanut butter mix more easily, ensuring a smooth and consistent dough. -
Don’t overbake.
The cookies should look slightly underdone when you remove them from the oven. They’ll continue to firm up as they cool. -
Work quickly with the chocolate kisses.
Press the chocolates into the cookies while they’re still warm so the bottoms melt slightly, securing them perfectly in place. -
For extra flavor, use natural peanut butter sparingly.
While natural peanut butter can work, it tends to make the dough crumbly. A classic creamy peanut butter like Jif or Skippy gives the best results. -
Store them properly.
Keep the cookies in an airtight container at room temperature for up to 5 days, or freeze them for longer storage.
Variations to Try
While traditional Peanut Butter Blossoms are perfect just as they are, a few small tweaks can make them even more special:
-
Chocolate Peanut Butter Blossoms: Add 1/4 cup unsweetened cocoa powder to the dough for an extra chocolatey twist.
-
Crunchy Version: Use chunky peanut butter for added texture and nutty crunch.
-
Mini Blossoms: Use mini chocolate kisses or peanut butter cups and make bite-sized versions—great for parties and lunchboxes.
-
Holiday Blossoms: Roll the dough in red and green sanding sugar before baking for a festive touch.
-
Dark Chocolate Kiss Cookies: Swap the milk chocolate for dark chocolate kisses for a richer, more sophisticated flavor.
Why You’ll Love This Recipe
There’s a reason Peanut Butter Blossoms have stood the test of time. They’re easy enough for beginners yet impressive enough for any occasion. Here’s why they deserve a spot in your recipe box:
-
Classic flavor combination: Peanut butter and chocolate—need we say more?
-
Simple ingredients: Everything you need is likely already in your pantry.
-
Perfect for any event: From Christmas to cookie swaps to everyday snacking, these cookies fit right in.
-
Kid-friendly: Children love to help roll the dough and press in the chocolate kisses.
-
Freezer-friendly: Bake ahead and store them for quick treats anytime.
Serving Ideas
Peanut Butter Blossoms shine on their own, but here are a few creative ways to serve them:
-
Cookie platters: Add them to a mix of holiday cookies for an eye-catching display.
-
Dessert boards: Pair with brownies, fudge, and chocolate-dipped pretzels.
-
Ice cream topping: Crumble a few over vanilla or chocolate ice cream for an indulgent twist.
-
Gift baskets: Wrap them in cellophane bags tied with ribbons for a sweet homemade present.
-
After-school snacks: Pair with a glass of milk for the ultimate comfort treat.
How to Store and Freeze
Room Temperature Storage:
Keep your cookies in an airtight container lined with parchment paper. Separate layers with additional parchment to prevent sticking. They’ll stay fresh for about 5 days.
Freezing the Cookies:
To freeze baked cookies, arrange them in a single layer on a baking sheet and freeze until solid. Then transfer to a freezer-safe bag or container. Thaw at room temperature before serving.
Freezing the Dough:
You can also freeze unbaked cookie dough balls (before rolling in sugar). When ready to bake, let them thaw for 10 minutes, roll in sugar, and bake as usual.
Troubleshooting Common Issues
Even the best bakers sometimes run into issues, but don’t worry—here’s how to fix them:
-
Cookies are too dry: You may have added too much flour. Always measure using the spoon-and-level method.
-
Cookies spread too much: Chill the dough for 15–20 minutes before baking to help them hold shape.
-
Chocolate kiss melts completely: Wait about 1 minute after removing cookies from the oven before pressing in the chocolate.
-
Dough is crumbly: Add a teaspoon of milk at a time until it holds together smoothly.
A Bit of History
The Peanut Butter Blossom was first introduced in the 1950s by Freda Smith, an Ohio homemaker, who entered it into the Pillsbury Bake-Off competition. Though it didn’t win first place, it became an instant classic, adored for its simplicity and its irresistible pairing of peanut butter and chocolate.
Since then, the cookie has been a holiday favorite across America, gracing dessert tables at Christmas, Thanksgiving, and beyond. Each generation has put its own spin on the recipe, but the comforting combination remains timeless.
Frequently Asked Questions
1. Can I make these cookies gluten-free?
Yes! Substitute the all-purpose flour with a gluten-free 1:1 baking flour blend. The texture will be slightly different but still delicious.
2. Can I use natural peanut butter?
You can, but make sure to stir it well before using. Keep in mind that natural peanut butter can create a drier dough, so you might need to add a tablespoon of milk to help it come together.
3. Can I freeze the dough for later?
Absolutely. Shape the dough into balls and freeze them on a baking sheet. Once firm, transfer them to a freezer bag. When ready to bake, roll in sugar and bake straight from frozen, adding an extra minute or two to the bake time.
4. Can I use different chocolates instead of kisses?
Of course! Mini peanut butter cups, caramel-filled chocolates, or even chunks of your favorite chocolate bar work wonderfully.
Final Thoughts
Melt-in-Your-Mouth Peanut Butter Blossoms are more than just cookies—they’re a warm, nostalgic embrace from the past. With their perfect balance of soft, chewy peanut butter dough and creamy chocolate centers, they’re the kind of treat that brings generations together.
Whether you’re baking for a holiday celebration, sharing with neighbors, or simply treating yourself to something sweet, these cookies never disappoint. Simple ingredients, easy steps, and a time-tested flavor make this recipe one you’ll come back to year after year.
So preheat that oven, unwrap those chocolate kisses, and fill your kitchen with the comforting scent of homemade Peanut Butter Blossoms. One bite, and you’ll understand why this classic cookie continues to capture hearts everywhere.
Print
Melt-in-Your-Mouth Peanut Butter Blossoms Recipe
- Total Time: 25 minutes
- Yield: 3 dozen cookies 1x
Description
There’s something magical about the smell of warm peanut butter cookies baking in the oven, especially when topped with a smooth chocolate kiss. These Melt-in-Your-Mouth Peanut Butter Blossoms bring back memories of holidays, family gatherings, and cozy evenings at home. Soft, chewy, and perfectly sweet, these classic cookies are a treat everyone loves. Whether you’re baking for Christmas, a cookie exchange, or simply craving something nostalgic, this timeless recipe delivers the perfect blend of creamy peanut butter and rich chocolate in every bite.
Ingredients
-
1/2 cup unsalted butter, softened
-
1/2 cup creamy peanut butter
-
1/2 cup granulated sugar
-
1/2 cup packed brown sugar
-
1 large egg
-
1 teaspoon vanilla extract
-
1 3/4 cups all-purpose flour
-
1 teaspoon baking soda
-
1/2 teaspoon baking powder
-
1/4 teaspoon salt
-
Extra granulated sugar for rolling
-
About 36 milk chocolate kisses, unwrapped
Instructions
-
Preheat your oven to 375°F (190°C). Line two baking sheets with parchment paper or silicone mats for easy cleanup.
-
In a large mixing bowl, beat together the butter, peanut butter, granulated sugar, and brown sugar until creamy and fluffy.
-
Add the egg and vanilla extract, mixing until well combined.
-
In a separate bowl, whisk together the flour, baking soda, baking powder, and salt. Gradually add the dry ingredients to the wet mixture, stirring just until combined.
-
Scoop about one tablespoon of dough per cookie, rolling each portion into a smooth ball.
-
Roll the dough balls in granulated sugar to coat evenly.
-
Place the dough balls on the prepared baking sheets, spacing them about two inches apart.
-
Bake for 8–10 minutes, or until the edges are lightly golden and the tops have small cracks.
-
Immediately press a chocolate kiss into the center of each cookie right after removing from the oven. The edges will crack slightly as the chocolate settles.
-
Let the cookies cool on the baking sheet for 5 minutes, then transfer them to a wire rack to cool completely.
-
Once cooled, the chocolate will firm up, leaving you with the perfect combination of soft peanut butter cookie and smooth chocolate center.
Notes
- Prep Time: 15 minutes
- Cook Time: 10 minutes


