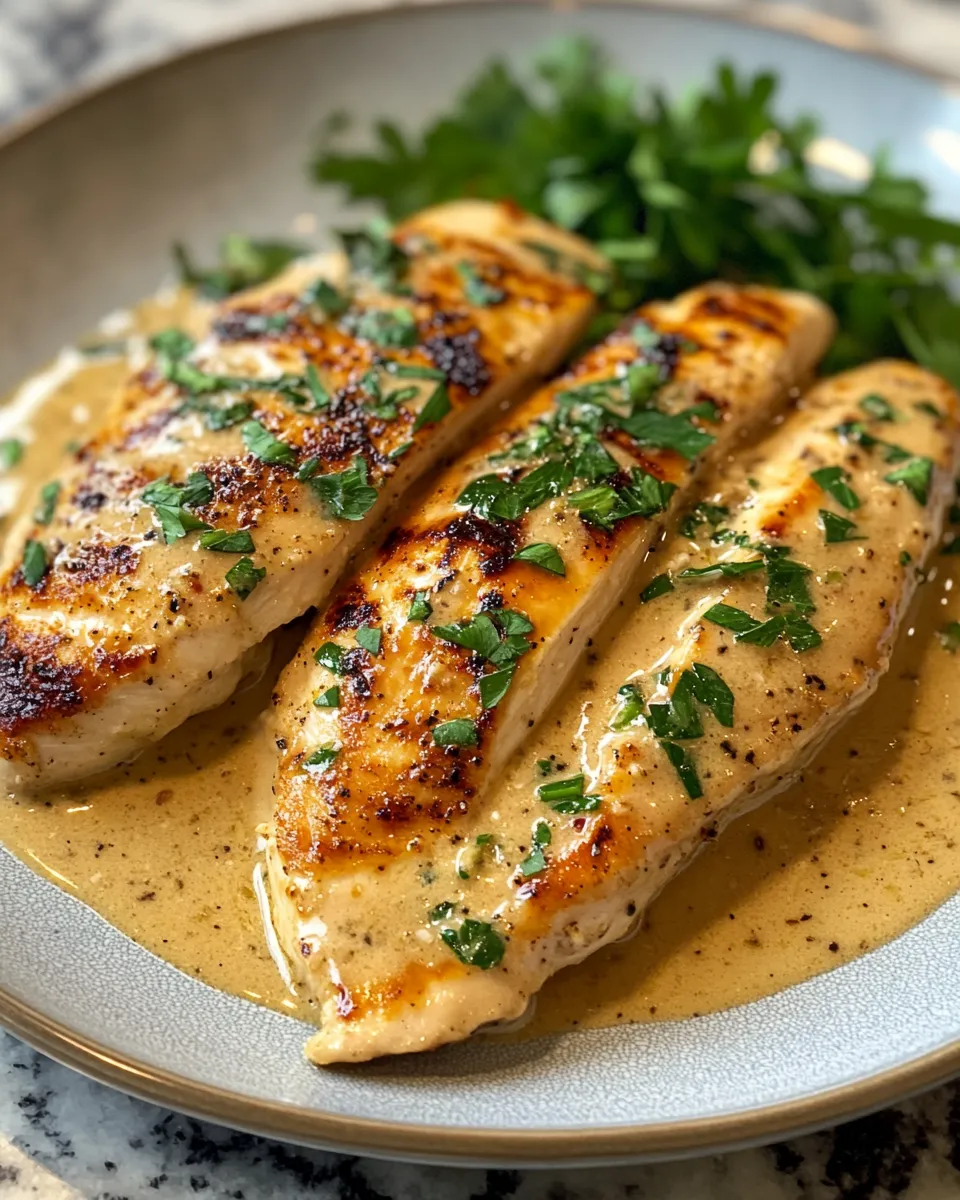
There’s something undeniably comforting about a perfectly crispy chicken cutlet. Whether you’re hosting a casual weeknight dinner, planning a weekend family gathering, or simply craving a satisfying meal after a long day, this recipe is your ticket to golden, crunchy perfection. Oven-baked chicken cutlets are a healthier alternative to traditional fried versions, yet they retain the irresistible crispiness that makes chicken a beloved classic.
This recipe was inspired by the timeless tradition of herb-infused home-cooked meals. Many of us grew up watching family members meticulously prepare meals with fresh herbs, creating layers of flavor that made simple dishes extraordinary. The combination of aromatic herbs and a perfectly seasoned breadcrumb coating makes these cutlets not just a meal but a comforting experience. The result is tender, juicy chicken enveloped in a delicate, flavorful crust that’s impossible to resist.
Perfectly paired with a crisp salad, roasted vegetables, or creamy mashed potatoes, these cutlets are versatile enough for lunch, dinner, or even a meal prep plan for the week. Read on to discover everything you need to know to master this recipe at home and make it a staple in your cooking repertoire.
Ingredients
-
4 boneless, skinless chicken breasts
-
1 cup all-purpose flour
-
2 large eggs
-
2 tablespoons milk
-
1 1/2 cups panko breadcrumbs
-
1 teaspoon garlic powder
-
1 teaspoon onion powder
-
1 teaspoon smoked paprika
-
1 teaspoon dried oregano
-
1 teaspoon dried thyme
-
1 teaspoon salt
-
1/2 teaspoon black pepper
-
1/4 cup grated Parmesan cheese
-
3 tablespoons olive oil or melted butter
-
Fresh parsley, chopped (for garnish)
Directions
1. Preheat the Oven and Prepare the Baking Sheet
Begin by preheating your oven to 400°F (200°C). This temperature is ideal for cooking chicken cutlets because it allows the exterior to turn golden and crisp while keeping the inside juicy and tender. Using too low a temperature can result in a soggy crust, while too high a temperature may cause the outside to brown too quickly, leaving the chicken undercooked.
While the oven is heating, prepare a large baking sheet. Line it with parchment paper or lightly grease it with olive oil. Parchment paper is especially helpful because it prevents the cutlets from sticking and makes cleanup a breeze. It also allows the heat to circulate evenly around the chicken, ensuring a consistently crispy crust. If you prefer, a silicone baking mat works just as well and is reusable, making it an eco-friendly option. For an extra layer of crunch, you can lightly brush the parchment with a little olive oil before placing the cutlets on it.
2. Prepare the Chicken Breasts
Next, prepare your chicken breasts. Start by patting them dry with paper towels. Removing excess moisture is essential because any water on the surface of the chicken can prevent the coating from adhering properly. Moisture can also interfere with browning, leaving your cutlets less crispy.
If your chicken breasts are thick or uneven in size, it’s a good idea to pound them to an even thickness. Place each breast between two sheets of plastic wrap and gently pound them with a meat mallet or rolling pin until they are about 1/2 inch thick. Uniform thickness ensures even cooking, so the outer layer doesn’t overcook before the center reaches a safe internal temperature. Pounding the chicken also tenderizes it, which makes every bite soft and juicy.
3. Set Up the Breading Station
For a smooth and efficient breading process, set up a three-step breading station. This not only keeps your kitchen organized but also ensures every cutlet has a consistent coating.
-
Flour mixture: In a shallow bowl, combine 1 cup of all-purpose flour with 1/2 teaspoon salt and 1/4 teaspoon black pepper. The flour creates a base layer that helps the egg wash stick to the chicken.
-
Egg wash: In another bowl, whisk together 2 large eggs and 2 tablespoons of milk until fully combined. The egg wash acts as the glue between the flour and breadcrumb layers, ensuring the coating adheres during baking.
-
Breadcrumb mixture: In a third bowl, mix 1 1/2 cups of panko breadcrumbs with 1 teaspoon each of garlic powder, onion powder, smoked paprika, oregano, thyme, 1/4 cup grated Parmesan cheese, and the remaining salt and pepper. This mixture is where the flavor and crunch come from, creating the signature crispy, herb-infused crust.
Having all three components ready before starting keeps the process organized and helps prevent any gaps in the coating.
4. Coat the Chicken Cutlets
Now, it’s time to coat the chicken. Begin by dredging each chicken breast in the flour mixture, shaking off any excess. Next, dip the floured chicken into the egg wash, allowing any extra to drip off. Finally, press the chicken firmly into the breadcrumb mixture, making sure every part is evenly coated.
Pay attention to the edges and corners of the chicken to ensure the coating adheres there as well. Proper coating is key for achieving maximum crunch. Repeat this process for all the cutlets, arranging them on a plate while you work so they don’t touch each other, which prevents sticking.
5. Drizzle with Olive Oil
Place the coated cutlets on the prepared baking sheet in a single layer. Drizzle the tops lightly with olive oil or melted butter. This step is crucial for turning the breadcrumbs golden in the oven without deep frying. The oil encourages browning and adds subtle richness to the crust. For a lighter option, a quick spray of cooking spray works well, but using oil or butter gives a deeper, more flavorful finish.
6. Bake Until Golden and Crisp
Bake the chicken cutlets in the preheated oven for 20 to 25 minutes. Halfway through the cooking time, flip each cutlet carefully to ensure both sides brown evenly. The key to perfectly cooked chicken is achieving an internal temperature of 165°F (74°C). The breadcrumbs should turn a beautiful golden brown, creating a crisp, crunchy exterior that contrasts perfectly with the tender meat inside.
Keep a close eye on the cutlets toward the end of baking. Depending on the size of your chicken breasts and your oven’s performance, some cutlets may cook slightly faster. If necessary, rotate the baking sheet to prevent uneven cooking.
7. Serve and Garnish
Once baked, remove the cutlets from the oven and allow them to rest for 3 to 5 minutes. Resting is an essential step because it allows the juices inside the chicken to redistribute, keeping the meat moist and flavorful. Cutting into the chicken immediately after baking can result in dry, uneven bites.
For presentation, garnish with freshly chopped parsley. The vibrant green not only adds visual appeal but also a subtle freshness that complements the herb-infused crust. These chicken cutlets are incredibly versatile and can be served in numerous ways: alongside roasted vegetables, tossed in a crisp salad, or sandwiched in a fresh roll for a hearty, flavorful meal.
With these steps, you’ll create oven-baked chicken cutlets that are consistently golden, crispy, and packed with flavor, making them a favorite for both family dinners and entertaining guests.

Tips for Perfect Crispy Oven-Baked Chicken
-
Use panko breadcrumbs – They are lighter and flakier than regular breadcrumbs, creating a crunchier crust.
-
Don’t skip the resting step – Resting prevents the juices from escaping and keeps the chicken moist.
-
Even thickness matters – Uniform chicken breasts cook evenly and ensure a consistent crispy texture.
-
Mix herbs into the breadcrumbs – Herbs add a depth of flavor that penetrates the crust during baking.
-
Avoid overcrowding the baking sheet – Give each cutlet space to bake evenly and maintain crispiness.
Flavor Variations to Try
-
Lemon herb chicken cutlets – Add zest from one lemon and a teaspoon of lemon juice to the breadcrumb mixture.
-
Spicy paprika cutlets – Mix 1/2 teaspoon cayenne pepper into the breadcrumb mixture for a subtle kick.
-
Cheesy garlic cutlets – Fold 2 tablespoons of shredded mozzarella into the breadcrumb mixture before baking.
-
Italian-style cutlets – Incorporate dried basil, rosemary, and a pinch of fennel seeds for a classic Italian flavor.
How to Serve Crispy Chicken Cutlets
Crispy chicken cutlets are versatile and pair well with numerous sides. Here are some serving ideas:
-
Classic sides – Mashed potatoes, steamed green beans, or roasted carrots make for a comforting, family-friendly dinner.
-
Light and fresh – Serve with a mixed greens salad, cherry tomatoes, cucumbers, and a light vinaigrette.
-
Sandwich style – Slice the cutlets and place them in a sandwich with lettuce, tomato, and a smear of garlic aioli.
-
Mediterranean flair – Pair with couscous, grilled vegetables, and a drizzle of tzatziki for a vibrant Mediterranean twist.
Meal Prep and Storage
One of the best things about oven-baked chicken cutlets is their suitability for meal prep. You can make a batch ahead of time and store them in the refrigerator for up to 4 days. For best results:
-
Allow the cutlets to cool completely before storing them in an airtight container.
-
Reheat in the oven at 350°F (175°C) for 8-10 minutes to restore the crispiness.
-
Freeze leftovers for up to 2 months; bake directly from frozen for best results.
Meal prepping these cutlets is a fantastic way to save time on busy weekdays while still enjoying a homemade, nutritious meal.
Why Oven-Baked Chicken Cutlets Are a Better Choice
Choosing oven-baked cutlets over traditional fried versions offers several benefits:
-
Healthier cooking method – Uses less oil, reducing overall fat content while still achieving a crispy texture.
-
Less mess – No splattering oil or deep fryer cleanup.
-
Even cooking – Baking ensures the chicken is cooked through without over-browning the crust.
-
Customizable flavor – Easily adjust herbs, spices, and cheese to suit your taste preferences.
Common Mistakes to Avoid
Even seasoned cooks can sometimes make mistakes when baking chicken cutlets. Here’s how to avoid them:
-
Skipping the flour step – The flour helps the egg and breadcrumb mixture adhere to the chicken.
-
Using too thick chicken breasts – Leads to uneven cooking and can dry out the outside before the inside is done.
-
Overcrowding the pan – Steam builds up, preventing a crispy crust.
-
Not flipping halfway – Ensures both sides are evenly browned and crisp.

Frequently Asked Questions
Can I use chicken thighs instead of breasts?
Yes! Boneless, skinless chicken thighs work well and offer a slightly juicier alternative. Adjust baking time slightly, as thighs may take a few minutes longer to cook.
Can I make these gluten-free?
Absolutely. Swap regular flour for almond flour or gluten-free flour and use gluten-free panko breadcrumbs.
Can I prepare these in advance?
Yes. Coat the chicken and store it in the refrigerator for up to a day before baking. This is perfect for busy evenings or meal prep.
What dipping sauces pair well?
Try honey mustard, garlic aioli, marinara, or a simple squeeze of fresh lemon. Each brings out a unique flavor that complements the herb-crusted chicken.

Crispy Oven-Baked Chicken Cutlets with Herbs Recipe
- Total Time: 40 minutes
- Yield: 4 servings 1x
Description
A perfect meal for cozy weeknights, family dinners, or any occasion when you crave something crispy, flavorful, and satisfying. These chicken cutlets are oven-baked for a healthier twist on the classic fried version, coated in a golden, herb-infused crust, and tender on the inside. Inspired by traditional home-cooked meals, this recipe delivers comfort and flavor with every bite.
Ingredients
-
boneless, skinless chicken breasts
-
1 cup all-purpose flour
-
2 large eggs
-
2 tablespoons milk
-
1 1/2 cups panko breadcrumbs
-
1 teaspoon garlic powder
-
1 teaspoon onion powder
-
1 teaspoon smoked paprika
-
1 teaspoon dried oregano
-
1 teaspoon dried thyme
-
1 teaspoon salt
-
1/2 teaspoon black pepper
-
1/4 cup grated Parmesan cheese
-
3 tablespoons olive oil or melted butter
-
Fresh parsley, chopped (for garnish)
Instructions
-
Preheat your oven to 400°F (200°C). Line a large baking sheet with parchment paper or lightly grease it with olive oil. This ensures even cooking and prevents sticking while keeping the crust crispy.
-
Pat chicken breasts dry with paper towels. If the breasts are thick, place between two sheets of plastic wrap and gently pound to an even thickness of about 1/2 inch. This ensures even cooking and tenderness.
-
Set up a three-step breading station:
-
Flour mixture: combine flour with 1/2 teaspoon salt and 1/4 teaspoon black pepper.
-
Egg wash: whisk together eggs and milk until smooth.
-
Breadcrumb mixture: mix panko, garlic powder, onion powder, smoked paprika, oregano, thyme, Parmesan cheese, and remaining salt and pepper.
-
-
Coat each chicken breast in flour, then dip in the egg wash, allowing excess to drip off, and finally press into the breadcrumb mixture, covering fully. Repeat for all cutlets.
-
Place coated cutlets on the prepared baking sheet in a single layer. Drizzle lightly with olive oil or melted butter to promote golden, crisp crust.
-
Bake in the preheated oven for 20-25 minutes, flipping halfway through for even browning. Chicken is done when it reaches an internal temperature of 165°F (74°C) and the coating is golden brown.
-
Remove cutlets from the oven and let rest for 3-5 minutes. Garnish with chopped parsley before serving. Serve alongside roasted vegetables, salads, or in sandwiches.
Notes
-
For extra crunch, double-coat the chicken by repeating the egg and breadcrumb steps.
-
Store leftovers in an airtight container and reheat in the oven to maintain crispiness.
-
Customize the flavor by trying different herbs or adding a pinch of cayenne for heat.
-
Make ahead: coat chicken and store in the fridge for up to a day before baking.
- Prep Time: 15 minutes
- Cook Time: 25 minutes