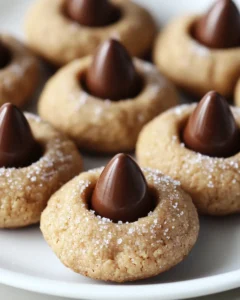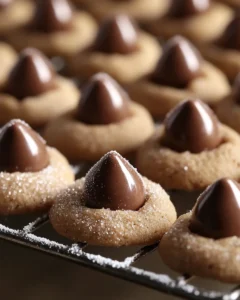
There’s something magical about the combination of creamy peanut butter and rich chocolate — a duo that never fails to delight dessert lovers of all ages. Chocolate Kiss Peanut Butter Blossoms bring that classic pairing to life in the most nostalgic and heartwarming way possible. Perfect for holiday cookie exchanges, bake sales, or cozy nights at home, these cookies are a timeless treat that always earns smiles.
Originating from mid-20th-century American kitchens, this recipe quickly became a staple on cookie trays during Christmas and family gatherings. With their signature chocolate kiss nestled in the center of each golden peanut butter cookie, they’re not just delicious — they’re a memory in every bite. Whether you’re recreating your grandmother’s recipe or baking these for the first time, these cookies promise the familiar comfort of home with every soft, chewy, chocolatey mouthful.
Ingredients
-
1/2 cup (1 stick) unsalted butter, softened
-
1/2 cup creamy peanut butter
-
1/2 cup granulated sugar
-
1/2 cup packed brown sugar
-
1 large egg
-
1 teaspoon pure vanilla extract
-
1 3/4 cups all-purpose flour
-
1 teaspoon baking soda
-
1/2 teaspoon baking powder
-
1/4 teaspoon salt
-
Additional granulated sugar, for rolling
-
About 36 milk chocolate kiss candies, unwrapped
Directions
-
Preheat and Prepare.
Preheat your oven to 375°F (190°C). Line two large baking sheets with parchment paper or silicone baking mats for easy cleanup and to ensure even baking. -
Cream the Butter and Sugars.
In a large mixing bowl, use an electric mixer to beat together the softened butter, creamy peanut butter, granulated sugar, and brown sugar until the mixture is smooth, fluffy, and well blended. This process should take about 2–3 minutes and helps create that soft, tender cookie texture. -
Add Wet Ingredients.
Beat in the egg and vanilla extract, mixing until fully incorporated. Scrape down the sides of the bowl as needed to make sure everything is well combined. -
Mix the Dry Ingredients.
In a separate bowl, whisk together the all-purpose flour, baking soda, baking powder, and salt. Slowly add this dry mixture to the peanut butter mixture, stirring on low speed until a soft dough forms. Avoid overmixing to maintain a delicate crumb. -
Shape the Cookies.
Scoop out about 1 tablespoon of dough for each cookie and roll it into a smooth ball using your palms. Roll each dough ball lightly in granulated sugar, coating it evenly. Place the sugared dough balls on the prepared baking sheets, spacing them about 2 inches apart. -
Bake to Perfection.
Bake in the preheated oven for 8–10 minutes, or until the cookies are lightly golden and puffed. The centers should still be soft — they’ll continue to set as they cool. -
Add the Chocolate Kiss.
Immediately after removing the cookies from the oven, gently press one unwrapped chocolate kiss into the center of each warm cookie. The edges will crack slightly, creating that signature “blossom” appearance. -
Cool Completely.
Allow the cookies to cool on the baking sheet for 5 minutes before transferring them to a wire rack to cool completely. The chocolate kiss will soften from the heat of the cookie but will firm up again as it cools. -
Serve and Enjoy.
Once cooled, your Chocolate Kiss Peanut Butter Blossoms are ready to enjoy! Serve them with a glass of milk, a cup of coffee, or a cozy mug of hot cocoa for the perfect finishing touch.
Prep Time
15 minutes
Cook Time
10 minutes
Total Time
25 minutes
Yield
About 36 cookies
Notes
-
Peanut Butter Choice: Creamy peanut butter provides the perfect texture, but you can use natural peanut butter if you prefer — just make sure to stir it well before adding. Avoid using oily or dry peanut butter blends.
-
Make Ahead: You can prepare the dough up to 2 days in advance. Simply refrigerate it in an airtight container and let it sit at room temperature for 15–20 minutes before shaping.
-
Freezing Instructions: Shape the dough into balls, roll them in sugar, and freeze on a baking sheet until solid. Once frozen, transfer to a freezer bag. Bake from frozen, adding an extra 1–2 minutes to the bake time.
-
Storage: Store cooled cookies in an airtight container at room temperature for up to 1 week. For longer storage, freeze the baked cookies for up to 3 months.
-
For Extra Soft Cookies: Do not overbake. Remove them as soon as the edges begin to turn golden — the centers will set perfectly as they cool.
-
Variation Idea: Try dark chocolate or white chocolate kisses for a fun twist, or use mini peanut butter cups for double the peanut butter flavor.
The Story Behind Chocolate Kiss Peanut Butter Blossoms
The origins of the Peanut Butter Blossom Cookie date back to the 1950s, when home bakers began experimenting with adding chocolate candies to their favorite peanut butter cookie recipes. The combination was an instant success, symbolizing the post-war era’s love of simple yet indulgent homemade treats. These cookies soon became a holiday essential — especially during Christmas, when cookie trays and swaps became popular traditions in American households.
The hallmark of a Peanut Butter Blossom is its cracked golden surface surrounding a perfectly centered chocolate kiss — a design that feels nostalgic, elegant, and delightfully comforting all at once. Each bite delivers a contrast of textures: the soft, chewy peanut butter cookie base paired with the smooth, melty chocolate center. It’s a simple recipe, but one that captures the spirit of homemade warmth and togetherness.
Why You’ll Love This Recipe
-
Classic and Nostalgic: This recipe captures that timeless homemade cookie taste everyone remembers from childhood.
-
Simple Ingredients: You likely already have everything you need in your pantry.
-
Quick to Make: From start to finish, these cookies are ready in under 30 minutes.
-
Perfect for Any Occasion: Whether it’s Christmas, Valentine’s Day, or a rainy weekend, these cookies are always a hit.
-
Crowd-Pleaser: Kids and adults alike can’t resist the irresistible combination of peanut butter and chocolate.
Tips for the Perfect Peanut Butter Blossoms
-
Use Room Temperature Ingredients: Allow your butter and egg to come to room temperature before mixing. This ensures even blending and a smoother dough texture.
-
Chill the Dough (Optional): If your dough feels too soft, refrigerate it for 30 minutes before shaping. This helps the cookies maintain their round shape while baking.
-
Don’t Overbake: The key to soft, chewy cookies is pulling them from the oven just before they look completely done. They’ll continue baking slightly on the hot tray.
-
Press Gently: When adding the chocolate kiss, don’t press too hard — just enough to slightly crack the surface.
-
Rotate Baking Sheets: If you’re baking multiple trays, rotate them halfway through baking to ensure even browning.
-
Cool Before Stacking: Make sure the chocolate kisses have fully set before storing or stacking the cookies, to avoid smudging.
Perfect Pairings
Chocolate Kiss Peanut Butter Blossoms are delicious on their own, but they also pair beautifully with a variety of beverages and desserts.
-
With Beverages: Serve them with a cold glass of milk, a hot cup of cocoa, or even a creamy latte for a cozy afternoon treat.
-
With Ice Cream: Sandwich two cookies with a scoop of vanilla ice cream in between for a fun dessert twist.
-
For Gift Giving: Arrange them in a decorative tin or wrap them in cellophane bags tied with a ribbon — a thoughtful, homemade gift everyone appreciates.
How to Make Them Look Bakery-Perfect
If you want your cookies to look picture-perfect — like something from a bakery display — here are a few presentation tips:
-
Uniform Size: Use a small cookie scoop to measure your dough balls evenly. This ensures consistent baking.
-
Sugary Sparkle: Roll the dough generously in granulated sugar before baking for that signature sparkle.
-
Clean Chocolate Tops: Make sure the chocolate kisses are completely unwrapped and clean before pressing them into the cookies — fingerprints can leave marks when the chocolate softens.
-
Cooling on a Rack: Allow cookies to cool completely before plating so the chocolate sets without smearing.
The Perfect Holiday Cookie
Chocolate Kiss Peanut Butter Blossoms are more than just cookies — they’re a piece of holiday nostalgia. They bring families together, filling kitchens with the scent of warm peanut butter and melting chocolate. These cookies have become a symbol of love and tradition, passed down from one generation to the next.
From cookie exchanges and festive gatherings to cozy nights watching movies by the fireplace, these cookies fit perfectly into any celebration. They’re simple enough for kids to help make, yet elegant enough to earn a spot on any dessert table.
So this season, when you’re planning your holiday baking, don’t forget the classics. These Chocolate Kiss Peanut Butter Blossoms are the kind of cookies that make memories — one soft, chocolate-topped bite at a time.
Troubleshooting Tips
If your cookies don’t turn out exactly how you want, don’t worry — here are a few quick fixes:
-
Cookies Spread Too Much: The dough might be too warm. Chill it for 30 minutes before baking.
-
Dry or Crumbly Dough: You may have added too much flour. Measure carefully using the spoon-and-level method.
-
Chocolate Melting Too Much: Let the cookies cool for 1–2 minutes before pressing in the chocolate kisses.
-
Uneven Baking: Make sure your oven is properly preheated and bake one tray at a time in the center rack.
Variations to Try
While the traditional version is unbeatable, there are fun ways to give this classic a personal touch:
-
Chocolate Peanut Butter Blossoms: Use chocolate cookie dough for a double-chocolate version.
-
Crunchy Version: Roll the dough in crushed peanuts instead of sugar before baking.
-
Mini Blossoms: Make bite-sized cookies using smaller dough balls and mini chocolate kisses.
-
Peanut Butter Cup Blossoms: Replace the kiss with a mini peanut butter cup for a richer peanut flavor.
-
White Chocolate Twist: Swap the milk chocolate kisses for white chocolate or caramel-filled ones.
Frequently Asked Questions
Can I use chunky peanut butter?
Yes, but it will slightly change the texture. For a smoother finish, creamy peanut butter is best.
Do I need to chill the dough?
It’s not required, but chilling helps if your dough is sticky or soft.
How do I keep the cookies soft?
Store them in an airtight container with a slice of bread. The bread helps retain moisture.
Can I double the recipe?
Absolutely! These cookies freeze well, so making a double batch is a great idea for gifting or storing.
Chocolate Kiss Peanut Butter Blossoms Recipe
- Total Time: 25 minutes
- Yield: 36 cookies 1x
Description
There’s nothing quite like the taste of homemade Chocolate Kiss Peanut Butter Blossoms — a timeless cookie that blends creamy peanut butter with smooth, melty chocolate. These cookies are perfect for the holidays, bake sales, or cozy family moments at home. With their classic crinkled tops and chocolate kiss centers, they’re as beautiful as they are delicious. Whether you’re baking them for a festive cookie tray or simply to satisfy a craving, this recipe brings comfort, nostalgia, and joy in every bite.
Ingredients
-
1/2 cup (1 stick) unsalted butter, softened
-
1/2 cup creamy peanut butter
-
1/2 cup granulated sugar
-
1/2 cup packed brown sugar
-
1 large egg
-
1 teaspoon pure vanilla extract
-
1 3/4 cups all-purpose flour
-
1 teaspoon baking soda
-
1/2 teaspoon baking powder
-
1/4 teaspoon salt
-
Additional granulated sugar for rolling
-
About 36 milk chocolate kiss candies, unwrapped
Instructions
-
-
Preheat oven to 375°F (190°C). Line two large baking sheets with parchment paper or silicone baking mats.
-
In a large bowl, beat together the softened butter, peanut butter, granulated sugar, and brown sugar until smooth and creamy, about 2–3 minutes.
-
Add the egg and vanilla extract, beating until fully combined. Scrape down the sides of the bowl as needed.
-
In another bowl, whisk together flour, baking soda, baking powder, and salt. Gradually add this dry mixture to the peanut butter mixture, mixing on low speed until a soft dough forms.
-
Scoop about 1 tablespoon of dough and roll into a ball. Coat each dough ball in granulated sugar, then place them on prepared baking sheets about 2 inches apart.
-
Bake for 8–10 minutes, or until the cookies are puffed and lightly golden around the edges. The centers should still be soft.
-
Immediately press one chocolate kiss into the center of each warm cookie. The edges will crack slightly, forming the signature blossom look.
-
Let cookies cool on the baking sheet for 5 minutes, then transfer to a wire rack to cool completely. The chocolate will firm up as it cools.
-
Serve once fully cooled and enjoy with a glass of milk or your favorite warm drink.
-
Notes
-
-
For the best texture, use creamy peanut butter rather than natural or oily varieties.
-
Chill dough for 30 minutes if it feels too soft before shaping.
-
To freeze, shape dough into balls, roll in sugar, and freeze on a tray. Once solid, store in a freezer bag. Bake from frozen, adding 1–2 extra minutes.
-
Store cookies in an airtight container at room temperature for up to 1 week or freeze for up to 3 months.
-
For variation, try using dark chocolate, white chocolate, or caramel-filled kisses.
-
Do not overbake — the cookies will continue setting as they cool, ensuring they stay soft and chewy.
-
- Prep Time: 15 minutes
- Cook Time: 10 minutes


