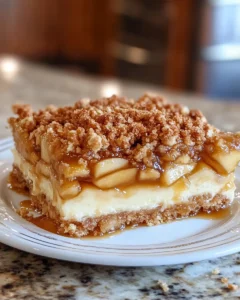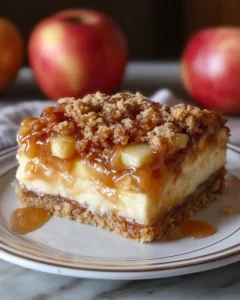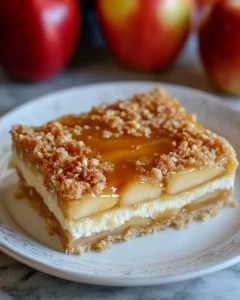
When autumn arrives, few flavors capture the cozy, nostalgic feeling of the season better than apples and caramel. Imagine a dessert that combines the crisp sweetness of baked apples, the silky richness of cheesecake, and the satisfying crunch of a buttery crust—all topped with a drizzle of golden caramel. That’s exactly what you get with Caramel Apple Cheesecake Bars.
This recipe is perfect for festive gatherings, potlucks, or as a sweet indulgence after a family dinner. It’s inspired by the tradition of enjoying caramel-dipped apples at fairs and fall festivals, but reimagined into an easy-to-serve dessert bar. Unlike traditional cheesecakes, these bars are more forgiving, quicker to make, and effortless to share. Whether you’re preparing treats for Thanksgiving, a cozy weekend at home, or a bake sale, these cheesecake bars will quickly become a favorite.
Why You’ll Love Caramel Apple Cheesecake Bars
There are countless dessert recipes out there, but this one stands out for several reasons:
-
Layered flavors: From the buttery crust to the creamy cheesecake, spiced apple topping, and caramel drizzle, each bite delivers a perfect balance of textures and tastes.
-
Portable & shareable: Unlike a classic round cheesecake, these bars cut neatly into squares or rectangles, making them ideal for parties and gatherings.
-
Comforting autumn flavors: The apples are gently spiced with cinnamon and nutmeg, giving that classic fall aroma and warmth.
-
Easy to customize: Swap the crust, change the apples, or add your favorite nuts to make the bars uniquely yours.
Ingredients
For the Crust
-
2 cups graham cracker crumbs (about 14 full sheets)
-
½ cup unsalted butter, melted
-
¼ cup granulated sugar
For the Cheesecake Filling
-
16 oz (2 blocks) cream cheese, softened
-
½ cup granulated sugar
-
¼ cup sour cream
-
2 large eggs
-
1 tsp vanilla extract
For the Apple Layer
-
2 large apples, peeled, cored, and finely diced (Granny Smith or Honeycrisp work well)
-
2 tbsp unsalted butter
-
¼ cup light brown sugar
-
1 tsp ground cinnamon
-
¼ tsp ground nutmeg
-
1 tsp lemon juice
For the Crumb Topping
-
¾ cup all-purpose flour
-
½ cup light brown sugar, packed
-
½ tsp ground cinnamon
-
¼ cup unsalted butter, softened
For Serving
-
Caramel sauce (store-bought or homemade)
Directions
1. Prepare the Crust
The first step to creating these indulgent bars is building a strong, flavorful base. Preheat your oven to 350°F (175°C) to ensure it’s ready once your crust is assembled. Line a 9×13-inch baking pan with parchment paper, leaving enough paper hanging over the sides to act as handles later. This step may seem minor, but it makes removing the bars and cutting them into neat squares so much easier.
In a medium mixing bowl, combine graham cracker crumbs, melted butter, and sugar. Stir the mixture until the crumbs are evenly moistened and resemble damp sand. It’s important to ensure every crumb is coated with butter; this helps the crust hold together when baked. Pour the mixture into your prepared pan and press it down firmly with the back of a spoon or the bottom of a flat measuring cup. A tightly packed crust prevents crumbling when you cut the bars later.
Bake the crust in the preheated oven for 8–10 minutes. The goal isn’t to brown it heavily but to set the base so it holds its shape. Once baked, remove the pan and allow the crust to cool slightly while you prepare the next layer.
2. Make the Cheesecake Filling
The cheesecake filling is what gives these bars their creamy, luxurious character. Start with softened cream cheese—if it’s too cold, it won’t blend smoothly and you’ll end up with lumps. Using an electric mixer, beat the cream cheese until light and fluffy. Add the granulated sugar and continue mixing until the mixture is silky.
Next, add in the sour cream, which contributes a subtle tanginess and keeps the cheesecake from tasting overly sweet. Crack in the eggs one at a time, mixing thoroughly after each addition. Be careful not to overbeat once the eggs are added, as too much air can cause cracks when baking. Finally, blend in the vanilla extract for warmth and depth.
Pour this creamy cheesecake mixture over the cooled crust, spreading it into an even layer with a spatula. Take a moment to smooth the surface, as this will help the apples and crumb topping sit neatly on top.
3. Prepare the Apple Topping
Now it’s time to add the star ingredient: the apples. Choose firm, tart varieties like Granny Smith for a contrast to the sweet cheesecake, or opt for Honeycrisp if you prefer a sweeter bite. Peel, core, and finely dice the apples so they distribute evenly over the cheesecake layer.
In a skillet set over medium heat, melt unsalted butter until it just begins to foam. Add the diced apples along with brown sugar, cinnamon, nutmeg, and a splash of lemon juice. The lemon juice prevents browning and brightens the overall flavor. Stir frequently as the apples cook, letting the sugar dissolve into a glossy syrup. After about 5 minutes, the apples should be slightly softened but not mushy—you want them to hold their shape during baking.
Spoon this spiced apple mixture evenly over the cheesecake filling. Spread it gently so that every slice will have a bit of apple in it.
4. Make the Crumb Topping
The crumb topping is the finishing touch that adds texture and a rustic look. In a small bowl, combine all-purpose flour, brown sugar, cinnamon, and softened butter. Use a fork or your fingers to work the butter into the dry ingredients until the mixture resembles coarse crumbs. If you prefer chunkier crumbs, pinch some of the mixture together to form larger clumps.
Sprinkle the topping evenly across the apple layer, covering as much surface as possible. As the bars bake, this topping will crisp up and add a delicious crunch to balance the creaminess of the cheesecake.
5. Bake the Bars
Place the assembled bars into your preheated oven and bake for 35–40 minutes. You’ll know they’re done when the cheesecake looks set but still has a slight jiggle in the center, and the crumb topping is lightly golden. Keep an eye on the edges—they may brown faster than the center, so check a few minutes early to avoid overbaking.
Once baked, remove the pan from the oven and set it on a cooling rack. Allow the bars to cool completely at room temperature before transferring them to the refrigerator. This step is crucial: chilling helps the cheesecake firm up and makes slicing easier. Plan for at least 3 hours of refrigeration, though overnight chilling yields the cleanest cuts and best flavor.
6. Serve with Caramel Drizzle
When you’re ready to serve, use the parchment paper overhang to carefully lift the bars out of the pan. Place them on a cutting board and use a sharp knife to slice into squares or rectangles. For neat edges, wipe the knife clean between cuts.
Arrange the bars on a serving platter and finish with a drizzle of caramel sauce over the top. The caramel adds sheen, sweetness, and that classic apple-caramel pairing everyone loves. Serve chilled or at room temperature for the best flavor and texture.
These bars are rich, creamy, and bursting with autumn flavor—perfect for sharing at holidays, potlucks, or simply enjoying with a cup of coffee on a crisp day.
Prep Time, Cook Time, Total Time, Yield
-
Prep Time: 25 minutes
-
Cook Time: 40 minutes
-
Total Time: 4 hours (including chilling)
-
Yield: About 16 bars
Tips for Perfect Caramel Apple Cheesecake Bars
-
Use the right apples: Tart varieties like Granny Smith provide a nice contrast to the sweetness of the cheesecake and caramel. Honeycrisp also works well for a sweeter profile.
-
Don’t skip chilling: Cooling the bars in the refrigerator allows the cheesecake layer to firm up, making them easier to slice and serve.
-
Line your pan: Parchment paper ensures the bars don’t stick and makes cleanup simple.
-
Make ahead: These bars can be prepared a day in advance, making them perfect for entertaining.
Variations to Try
-
Nutty Crunch: Add chopped pecans or walnuts to the crumb topping for extra crunch.
-
Shortbread Crust: Swap the graham cracker crust with a buttery shortbread base for a richer flavor.
-
Spiced Caramel: Drizzle with cinnamon or salted caramel sauce to enhance the autumn flavors.
-
Mini Bars: Use a muffin tin lined with cupcake wrappers for individual portions.
Serving Suggestions
These cheesecake bars are versatile and pair beautifully with many occasions:
-
Holiday Gatherings: Serve them at Thanksgiving or Christmas as a lighter alternative to pie.
-
Casual Get-Togethers: Perfect for potlucks or family dinners where finger-friendly desserts are a hit.
-
Coffee or Tea Pairing: The creamy, spiced flavors complement a hot cup of coffee, chai tea, or apple cider.
-
Dessert Buffet: Add them to a dessert table alongside brownies, cookies, and cupcakes for variety.
Storing Leftovers
-
Refrigerator: Store leftover bars in an airtight container for up to 4 days.
-
Freezer: Freeze for up to 2 months, wrapping each bar individually for easier serving later.
-
Room Temperature: Avoid leaving them out for more than 2 hours to maintain freshness and food safety.
Why This Recipe Works
The magic of Caramel Apple Cheesecake Bars lies in the layering technique. The graham cracker crust provides a solid foundation, the cheesecake filling adds creamy richness, the apple layer delivers warmth and spice, and the crumb topping introduces a crunchy texture. Finished with caramel sauce, it strikes the perfect balance of sweet, tart, creamy, and crunchy in every bite.
Unlike a whole cheesecake that requires careful baking in a water bath, these bars are more approachable and less intimidating, making them perfect for beginner bakers who still want to impress.
Frequently Asked Questions
Can I make these bars ahead of time?
Yes! In fact, they taste even better the next day after the flavors have had time to meld. Store them in an airtight container in the fridge for up to 4 days.
Can I freeze Caramel Apple Cheesecake Bars?
Absolutely. Once cooled and chilled, wrap the bars tightly in plastic wrap and place them in a freezer-safe container. They can be frozen for up to 2 months. Thaw in the fridge overnight before serving.
Do I need to peel the apples?
Peeling the apples is recommended for the best texture, but if you enjoy the added chewiness and fiber, you can leave the peels on.
Can I use a different fruit?
Yes! Pears, peaches, or berries can be used in place of apples, though the flavor will be slightly different.
Print
Caramel Apple Cheesecake Bars Recipe
- Total Time: 1 hour 5 minutes
- Yield: About 16 bars 1x
Description
These Caramel Apple Cheesecake Bars are the perfect dessert for fall, combining a buttery graham cracker crust, creamy cheesecake filling, spiced apple topping, and a crumbly streusel finish. Topped with caramel sauce, each bite delivers layers of flavor and texture that make this recipe a crowd favorite. Ideal for holidays, gatherings, or cozy nights in, these bars are easy to make, slice, and share.
Ingredients
For the Crust
-
2 cups graham cracker crumbs (about 14 full sheets)
-
½ cup unsalted butter, melted
-
¼ cup granulated sugar
For the Cheesecake Filling
-
16 oz (2 blocks) cream cheese, softened
-
½ cup granulated sugar
-
¼ cup sour cream
-
2 large eggs
-
1 tsp vanilla extract
For the Apple Layer
-
2 large apples, peeled, cored, and finely diced (Granny Smith or Honeycrisp recommended)
-
2 tbsp unsalted butter
-
¼ cup light brown sugar
-
1 tsp ground cinnamon
-
¼ tsp ground nutmeg
-
1 tsp lemon juice
For the Crumb Topping
-
¾ cup all-purpose flour
-
½ cup light brown sugar, packed
-
½ tsp ground cinnamon
-
¼ cup unsalted butter, softened
For Serving
-
Caramel sauce (store-bought or homemade)
Instructions
-
Preheat the oven to 350°F (175°C). Line a 9×13-inch baking pan with parchment paper, leaving some overhang for easy removal.
-
In a mixing bowl, combine graham cracker crumbs, melted butter, and sugar. Stir until moistened, then press firmly into the prepared pan. Bake for 8–10 minutes, then let cool slightly.
-
In a large bowl, beat softened cream cheese with an electric mixer until smooth. Add sugar and blend again. Mix in sour cream, then add eggs one at a time, mixing after each. Stir in vanilla extract. Spread the cheesecake filling evenly over the cooled crust.
-
In a skillet over medium heat, melt butter. Add diced apples, brown sugar, cinnamon, nutmeg, and lemon juice. Cook, stirring often, until apples soften slightly and the mixture becomes glossy, about 5 minutes. Spread evenly over the cheesecake layer.
-
In a separate bowl, combine flour, brown sugar, cinnamon, and softened butter. Mix with a fork or hands until crumbly. Sprinkle over the apple layer.
-
Bake for 35–40 minutes, or until the cheesecake is set and the topping is golden. Cool completely at room temperature, then refrigerate for at least 3 hours or overnight.
-
Lift the chilled bars from the pan using the parchment overhang. Cut into squares or rectangles. Drizzle with caramel sauce before serving.
Notes
-
Use tart apples like Granny Smith for the best balance of flavor, or opt for Honeycrisp for natural sweetness.
-
For cleaner slices, chill overnight and wipe the knife between each cut.
-
These bars store well in the fridge for up to 4 days and can be frozen for up to 2 months.
-
Add chopped pecans or walnuts to the crumb topping for extra crunch.
-
If you don’t have graham crackers, substitute digestive biscuits, vanilla wafers, or crushed pretzels for a fun twist.
- Prep Time: 25 minutes
- Cook Time: 45 minutes


