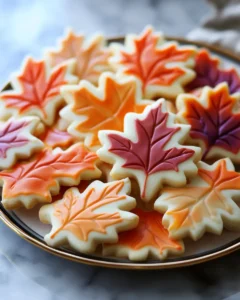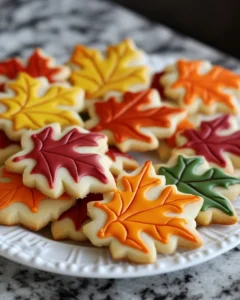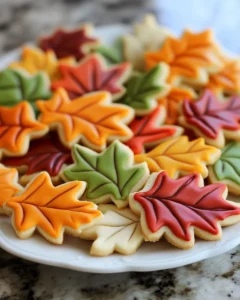
Autumn has a way of bringing comfort to the table, with crisp air, golden leaves, and cozy gatherings. One of the most delightful ways to celebrate this season is through baking, and nothing captures the essence of fall better than Autumn Leaf Sugar Cookies. These cookies are not only buttery and crisp with the perfect sweetness but also shaped and decorated to resemble colorful fall foliage.
This recipe is inspired by seasonal traditions where baking becomes a way to bring family and friends together. Whether it’s for a Thanksgiving dessert spread, a fall bake sale, or simply a cozy weekend activity, these cookies add warmth and joy. Decorating them is half the fun—you can swirl together vibrant reds, yellows, and oranges to mimic nature’s palette. By the time they’re on the plate, they’ll look as though autumn leaves have scattered right across your table.
Why You’ll Love Autumn Leaf Sugar Cookies
There are plenty of sugar cookie recipes out there, but this version stands apart because it combines nostalgia, seasonal charm, and creativity:
-
Perfect for Fall Gatherings – Whether you’re hosting or bringing treats to share, these cookies become an eye-catching centerpiece.
-
Fun for All Ages – Kids love cutting leaf shapes and blending food colors, while adults enjoy the craft-like activity.
-
Customizable Colors – Blend fall-inspired hues into the icing for a true seasonal look.
-
Delicious and Buttery – Beyond their beauty, these cookies have a tender crumb with a melt-in-your-mouth sweetness.
If you’ve been searching for a way to bring fall flavors and festivities into your kitchen, this recipe is the perfect place to start.
Ingredients
For the Cookies
-
2 ¾ cups all-purpose flour
-
1 teaspoon baking powder
-
½ teaspoon salt
-
1 cup unsalted butter, softened
-
1 cup granulated sugar
-
1 large egg
-
1 teaspoon pure vanilla extract
For the Royal Icing
-
4 cups powdered sugar, sifted
-
3 tablespoons meringue powder
-
6 tablespoons water (adjust as needed for consistency)
-
Food coloring gels (red, yellow, orange, and green)
Directions
1. Prepare the Dough
Start by gathering all of your dry ingredients. In a medium mixing bowl, whisk together the all-purpose flour, baking powder, and salt. Whisking evenly distributes the leavening and salt, which helps ensure consistent texture and flavor throughout every cookie.
In a separate large mixing bowl, cream the softened butter and granulated sugar together. Use a hand mixer or stand mixer fitted with the paddle attachment, and beat on medium speed for 2–3 minutes until the mixture turns pale and fluffy. This step incorporates air, giving your cookies a light and tender bite.
Next, beat in the egg and vanilla extract until the mixture is smooth and well combined. Slowly add the flour mixture to the wet ingredients, about one-third at a time, mixing on low speed to prevent overworking the dough. Overmixing can lead to tough cookies, so stop as soon as the dough comes together. The finished dough should be soft, pliable, and slightly firm, but not sticky. If the dough feels too sticky, sprinkle in another tablespoon of flour and mix briefly.
2. Chill the Dough
Divide the dough into two equal portions and flatten each into a disk. Wrap the disks tightly in plastic wrap. Chilling is essential for sugar cookies—it solidifies the butter, firms the dough, and prevents the cookies from spreading too much in the oven. Without this step, your carefully cut leaf shapes might lose their definition.
Refrigerate the dough for at least one hour. If you’re short on time, 30 minutes in the freezer will also work. The dough can be made ahead and stored in the fridge for up to three days or frozen for three months. Just remember to thaw frozen dough overnight in the refrigerator before rolling.
3. Cut Out the Cookies
When you’re ready to bake, preheat your oven to 350°F (175°C). Line baking sheets with parchment paper or silicone baking mats to prevent sticking and encourage even browning.
Lightly flour a clean surface and your rolling pin. Take one dough disk from the refrigerator and roll it out to about ¼-inch thickness. Rotate the dough occasionally as you roll to prevent sticking, adding a touch of flour as needed. Too much flour, however, can make the cookies dry, so use sparingly.
Use leaf-shaped cookie cutters to press out shapes from the dough. For variety, try using multiple styles of cutters—maple, oak, or even a simple oval leaf shape. Gather any scraps, re-roll, and continue cutting until all the dough is used. Place the cutouts about 1 inch apart on the prepared baking sheets.
4. Bake the Cookies
Slide the baking sheets into the preheated oven and bake for 8–10 minutes. The cookies should be set and just beginning to turn golden around the edges. Keep a close eye on them—overbaking will result in hard, overly crisp cookies.
Once done, remove the baking sheets from the oven and let the cookies rest for about 5 minutes. This allows them to firm up slightly, making it easier to transfer them. Carefully move the cookies to a wire rack to cool completely. Decorating on warm cookies will cause the icing to melt and slide off, so patience is key here.
5. Make the Icing
While the cookies cool, prepare the royal icing. In a large mixing bowl, combine powdered sugar, meringue powder, and water. Beat on medium-high speed for 5–7 minutes until the icing is glossy and holds soft peaks. The consistency should be thick but pipeable. If the icing seems too stiff, add water one teaspoon at a time. If too thin, sift in more powdered sugar.
Divide the icing into several small bowls. Add gel food coloring to each bowl, mixing well to create the vibrant hues of autumn—think fiery red, bright yellow, golden orange, and earthy green. Gel colors are ideal because they provide rich tones without thinning the icing.
6. Decorate the Cookies
Once the cookies are completely cooled, it’s time for the most creative step—decorating. Fill piping bags or squeeze bottles with your colored icing. Start by outlining each cookie with a thin border of icing, then flood the inside with slightly thinned icing. Use a toothpick or scribe tool to gently spread the icing into corners and smooth the surface.
For a marbled effect, drop small dots of a second color onto the wet base icing and swirl lightly with a toothpick. This creates a stunning, natural look reminiscent of real autumn leaves. For added dimension, let one layer dry before piping veins or outlines on top with a contrasting color.
Allow the decorated cookies to sit at room temperature for several hours, or preferably overnight, until the icing is fully set and hardened. Once dry, the cookies can be stacked or packaged without smudging the designs.
Tips for the Best Results
-
Chill Thoroughly – Don’t skip chilling the dough; it prevents spreading.
-
Use Gel Food Coloring – Gel or paste gives vibrant color without thinning the icing.
-
Try Different Leaf Cutters – Maple, oak, or simple oval leaf cutters add variety to your cookie platter.
-
Plan Ahead – Royal icing can take several hours to dry, so decorate the day before serving if possible.
Variations to Try
-
Pumpkin Spice Sugar Cookies – Add 1 teaspoon cinnamon, ½ teaspoon nutmeg, and a pinch of cloves to the dough for a fall-spiced version.
-
Glazed Autumn Cookies – Instead of royal icing, dip cooled cookies into a simple glaze made with powdered sugar and milk.
-
Sandwich Cookies – Spread a thin layer of buttercream or jam between two leaf-shaped cookies for a festive twist.
-
Glitter Leaves – Dust edible glitter over the icing before it sets for a sparkling autumn effect.
Serving Ideas
-
Thanksgiving Dessert Platter – Arrange the cookies alongside pumpkin pie and apple crisp for a seasonal spread.
-
Gift Giving – Wrap in cellophane bags tied with ribbon for neighborly gifts or teacher treats.
-
Coffee Companion – Enjoy these cookies with a hot mug of apple cider or spiced tea on a crisp autumn afternoon.
Make It a Family Tradition
Baking Autumn Leaf Sugar Cookies can become more than just a seasonal activity—it can be a tradition. Imagine gathering with your kids, rolling out the dough, and letting them pick their favorite colors to decorate leaves. Each cookie becomes a little work of art, and the memories made in the process are even sweeter than the cookies themselves.
Families often find that baking together during the holidays builds anticipation and joy, turning ordinary weekends into meaningful rituals. If you’re looking for a fun, interactive tradition to start this fall, this recipe is a wonderful place to begin.
The Story Behind Leaf-Shaped Cookies
Leaf-shaped cookies have long been associated with fall festivals and harvest celebrations. They symbolize the beauty of nature’s cycle and bring a bit of the outdoors into your kitchen. Decorating cookies as leaves not only honors the changing season but also allows bakers to express creativity. The practice has grown popular in North America, where fall foliage is a cultural hallmark, making these cookies an especially fitting tribute to the season.
Storage and Freezing Tips
-
Storage: Place cooled, decorated cookies in a single layer inside an airtight container. If stacking, separate layers with parchment paper.
-
Freezing Dough: Wrap dough disks tightly in plastic wrap and aluminum foil before freezing. Thaw overnight in the refrigerator before rolling.
-
Freezing Baked Cookies: Undecorated cookies freeze well for up to three months. Allow to thaw completely before icing.
Troubleshooting Common Issues
-
Cookies Spread Too Much: Ensure the dough was chilled long enough and that your baking sheets weren’t warm when placing the dough.
-
Icing Too Runny: Add more powdered sugar, one tablespoon at a time, until you reach the right consistency.
-
Colors Bleeding Together: Allow base layers of icing to dry before adding details or outlines.
Frequently Asked Questions
Can I make the dough ahead of time?
Yes! You can prepare the dough up to three days in advance and keep it refrigerated. For longer storage, freeze the dough for up to three months.
Stored in an airtight container, the cookies stay soft and fresh for up to one week. If decorated with royal icing, they can last slightly longer since the icing helps seal in moisture.
Can I use buttercream instead of royal icing?
Absolutely. Buttercream makes for a softer, creamier topping, though it won’t dry hard like royal icing.
Do I need to use meringue powder for the icing?
Meringue powder helps royal icing harden and hold shape. If unavailable, you can make a simple glaze with powdered sugar and water, but the result will be softer.
Print
Autumn Leaf Sugar Cookies Recipe
- Total Time: 2 hours (including chilling and decorating)
- Yield: 30 cookies 1x
Description
These Autumn Leaf Sugar Cookies are a festive and fun way to celebrate the beauty of fall. With buttery, tender dough and vibrant royal icing decorations, they’re perfect for Thanksgiving dessert tables, fall parties, or as homemade gifts. Shaped like colorful leaves, these cookies are as delightful to look at as they are to eat, making them a seasonal favorite for bakers of all ages.
Ingredients
-
2 ¾ cups all-purpose flour
-
1 teaspoon baking powder
-
½ teaspoon salt
-
1 cup unsalted butter, softened
-
1 cup granulated sugar
-
1 large egg
-
1 teaspoon pure vanilla extract
For the Royal Icing
-
4 cups powdered sugar, sifted
-
3 tablespoons meringue powder
-
6 tablespoons water (adjust as needed)
-
Food coloring gels (red, yellow, orange, green)
Instructions
-
Prepare the Dough
Whisk together flour, baking powder, and salt in a medium bowl. In a separate large bowl, cream butter and sugar until light and fluffy. Beat in the egg and vanilla. Gradually add the dry ingredients, mixing just until combined. Dough should be soft but not sticky. -
Chill the Dough
Divide dough into two disks, wrap tightly in plastic wrap, and refrigerate for at least 1 hour. Chilling helps the cookies hold their leaf shapes during baking. -
Cut Out the Cookies
Preheat oven to 350°F (175°C). Roll out chilled dough on a lightly floured surface to ¼-inch thickness. Cut into leaf shapes with cookie cutters and place on parchment-lined baking sheets. -
Bake the Cookies
Bake for 8–10 minutes, or until edges are lightly golden. Cool cookies on the baking sheet for 5 minutes, then transfer to a wire rack to cool completely. -
Make the Icing
Beat powdered sugar, meringue powder, and water until glossy and thick enough to hold soft peaks. Divide into bowls and tint each portion with food coloring gel to create fall shades. -
Decorate the Cookies
Outline and flood cooled cookies with colored icing using piping bags or squeeze bottles. For a marbled look, swirl in drops of contrasting colors with a toothpick. Let cookies dry at room temperature until icing is fully set.
Notes
-
Chill the dough thoroughly to help the cookies maintain their shape.
-
Gel food coloring provides the most vibrant fall hues without thinning the icing.
-
Allow icing to dry fully before stacking or packaging decorated cookies.
-
Dough can be made ahead and stored in the fridge for 3 days or frozen for 3 months.
- Prep Time: 25 minutes
- Cook Time: 10 minutes per batch


