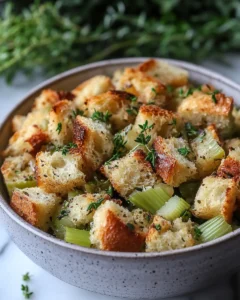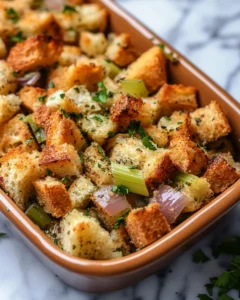
There’s something truly special about the comforting aroma of freshly baked stuffing wafting through the kitchen. This Homestyle Herb & Onion Stuffing is the kind of side dish that instantly makes any meal feel like a celebration. Whether it’s Thanksgiving, a Sunday family dinner, or a cozy winter evening, this stuffing brings warmth and nostalgia to the table. The recipe is a tribute to the timeless art of home cooking—simple, hearty, and filled with classic flavors that remind us of family gatherings and home-cooked meals from childhood. With a blend of savory herbs, sweet caramelized onions, and perfectly toasted bread cubes, every bite offers a delicious balance of textures and taste. This stuffing isn’t just a side—it’s the heart of a holiday spread, made to bring people together around the table.
The Comfort of a Classic Stuffing
When it comes to holiday meals or comforting feasts, few dishes are as iconic as a warm, herby stuffing. It’s the dish that often steals the show—soft on the inside, crisp on the edges, and seasoned just right. While store-bought mixes are convenient, nothing compares to the freshness and depth of flavor you get from making stuffing from scratch.
This Homestyle Herb & Onion Stuffing combines earthy herbs, sautéed onions, celery, and a buttery base that ties everything together beautifully. It’s incredibly versatile—you can use any bread you have on hand, whether it’s white, whole wheat, or even sourdough. The goal is to create a stuffing that tastes homemade in every sense: familiar yet unforgettable.
Why You’ll Love This Recipe
-
Timeless Flavor: Classic herbs and onions create that nostalgic stuffing flavor everyone craves.
-
Perfect Texture: Soft and moist interior with just the right amount of crispness on top.
-
No Pork or Alcohol: A wholesome, family-friendly version suitable for everyone at the table.
-
Make-Ahead Friendly: Can be prepared a day before to save time during busy holidays.
-
Customizable: Easily adapt with your favorite add-ins like mushrooms, carrots, or extra herbs.
Ingredients
-
1 loaf (about 1 pound) day-old bread, cubed (white, whole wheat, or sourdough)
-
1 cup unsalted butter
-
2 medium onions, finely chopped
-
3 stalks celery, finely diced
-
3 garlic cloves, minced
-
2 ½ teaspoons dried sage
-
2 teaspoons dried thyme
-
1 teaspoon dried rosemary
-
½ teaspoon marjoram (optional for extra depth)
-
1 ½ teaspoons salt
-
½ teaspoon black pepper
-
3 cups vegetable or chicken broth (low-sodium preferred)
-
2 large eggs, beaten
-
¼ cup fresh parsley, chopped
Directions
-
Prepare the Bread Cubes
Start by cutting the bread into ¾-inch cubes. If your bread is fresh, spread the cubes out on a baking sheet and toast in the oven at 300°F (150°C) for about 15–20 minutes, or until lightly crisp. Let them cool completely. Using slightly stale or toasted bread helps the stuffing hold its texture without becoming soggy. -
Cook the Aromatics
In a large skillet, melt the butter over medium heat. Add the chopped onions and celery, cooking until softened and fragrant—about 8–10 minutes. Stir in the minced garlic and cook for another minute until it becomes aromatic. -
Season with Herbs and Spices
Sprinkle in the sage, thyme, rosemary, marjoram (if using), salt, and pepper. Stir well to coat the vegetables evenly in the herb butter. This step builds the foundation of flavor that makes the stuffing so rich and aromatic. -
Combine Bread and Vegetables
Transfer the toasted bread cubes into a large mixing bowl. Pour the buttery onion mixture over the top, tossing gently until the bread is evenly coated with herbs and butter. -
Add the Broth and Eggs
Gradually pour the broth over the mixture while stirring lightly. You want the bread to absorb the liquid but not turn mushy—it should be moist but still hold shape. Stir in the beaten eggs and chopped parsley. -
Bake the Stuffing
Preheat your oven to 350°F (175°C). Lightly grease a 9×13-inch baking dish and spoon the stuffing mixture into it. Cover with foil and bake for 30 minutes. Then, uncover and bake for an additional 20–25 minutes until the top turns golden brown and slightly crisp. -
Serve Warm
Let the stuffing rest for 5–10 minutes before serving. This helps the flavors settle and makes it easier to scoop. Serve it alongside roasted chicken, turkey, or your favorite vegetarian entrée.
Prep Time, Cook Time, Total Time, Yield
-
Prep Time: 20 minutes
-
Cook Time: 55 minutes
-
Total Time: 1 hour 15 minutes
-
Yield: Serves 8–10
The Secret to Perfect Stuffing Every Time
The secret to achieving the perfect stuffing lies in balance—moisture, texture, and flavor must come together in harmony. Here are a few tips to ensure your Homestyle Herb & Onion Stuffing turns out just right:
-
Use day-old bread. Fresh bread can make your stuffing gummy, while slightly dry bread absorbs the broth beautifully.
-
Don’t skip the herbs. Sage, thyme, and rosemary are the backbone of traditional stuffing flavor.
-
Mind the moisture. Add broth gradually. Too much will make it soggy, too little will make it dry.
-
Bake uncovered for a crispy top. The final bake without foil creates a delightful golden crust that contrasts with the soft center.
Serving Suggestions
This classic herb and onion stuffing pairs beautifully with a wide variety of main dishes and sides. Here are some pairing ideas to make your meal unforgettable:
-
Roasted Chicken or Turkey: The savory flavors of the stuffing complement the mild, juicy taste of poultry.
-
Herb-Crusted Roast Beef: Adds a hearty balance to the meal while maintaining that comforting, homemade feel.
-
Vegetarian Options: Serve it alongside roasted vegetables, mashed potatoes, and green bean casserole for a completely meat-free feast.
-
Cranberry Sauce or Gravy: These add moisture and brightness that enhance the richness of the stuffing.
Storage and Reheating Tips
If you’re lucky enough to have leftovers, this stuffing stores beautifully and even tastes better the next day.
-
Refrigerate: Store in an airtight container for up to 4 days.
-
Freeze: For longer storage, freeze in a freezer-safe dish for up to 2 months.
-
Reheat: Warm in the oven at 350°F until heated through. Add a splash of broth before reheating to restore moisture.
Variations to Try
If you’d like to add a personal touch, try one of these delicious twists:
-
Mushroom Herb Stuffing: Add 2 cups of sautéed mushrooms for a rich, earthy flavor.
-
Apple & Celery Stuffing: Stir in 1 cup of diced apples for a subtle sweetness that contrasts the savory herbs.
-
Caramelized Onion Stuffing: Use caramelized onions instead of regular ones for extra sweetness and depth.
-
Vegetable Stuffing: Add chopped carrots, peas, or green beans for color and freshness.
-
Whole Wheat or Multigrain Bread: For a heartier, more rustic version.
The Heart of Holiday Cooking
Stuffing has a way of connecting people—it’s a dish passed down through generations, changing slightly from one family to another but always holding the same meaning. It represents togetherness, warmth, and comfort.
This Homestyle Herb & Onion Stuffing embodies all those qualities in a simple yet flavorful way. It’s not about fancy ingredients—it’s about the memories created when everyone gathers around the table, sharing stories over a dish that feels like home. The buttery herbs, tender onions, and perfectly toasted bread make each forkful a reminder of what makes homemade food so special.
As the holidays roll around or you’re just craving something cozy, this recipe is a beautiful reminder that good food doesn’t have to be complicated—it just has to be made with care.


