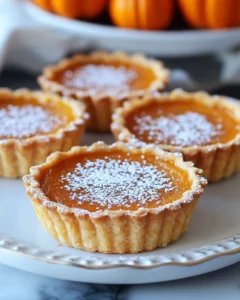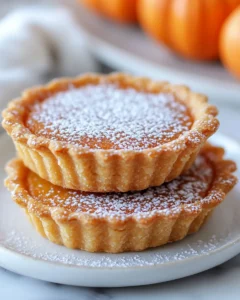
As the crisp air of autumn settles in and the leaves turn golden, there’s nothing quite like the aroma of pumpkin filling a kitchen. Mini Pumpkin Tarts are the perfect way to celebrate the flavors of the season in a bite-sized form. Whether you’re planning a cozy evening at home, a festive Thanksgiving gathering, or a delightful treat for your friends and family, these tarts are sure to impress. Their buttery crusts hold a creamy, spiced pumpkin filling that’s both comforting and indulgent, making them a crowd-pleaser for all ages.
The inspiration for these tarts comes from a beloved fall tradition: sharing small, homemade desserts that bring warmth and joy to gatherings. In many cultures, pumpkin symbolizes abundance and harvest, and turning it into charming mini tarts is a playful way to honor that tradition while making dessert personal and memorable.
Ingredients
For the Crust:
-
1 ½ cups all-purpose flour
-
½ cup powdered sugar
-
¼ teaspoon salt
-
½ cup unsalted butter, chilled and cubed
-
1 large egg yolk
-
1-2 tablespoons cold water
For the Pumpkin Filling:
-
1 cup pumpkin puree (fresh or canned)
-
½ cup brown sugar
-
¼ cup granulated sugar
-
2 large eggs
-
½ cup heavy cream
-
½ teaspoon ground cinnamon
-
¼ teaspoon ground nutmeg
-
¼ teaspoon ground ginger
-
⅛ teaspoon ground cloves
-
½ teaspoon vanilla extract
For Garnish (Optional):
-
Whipped cream
-
Chopped toasted pecans
-
A sprinkle of cinnamon or nutmeg
Directions
1. Prepare the Tart Crust
Start by combining the flour, powdered sugar, and salt in a large mixing bowl. Add the chilled, cubed butter and use a pastry cutter or your fingers to blend until the mixture resembles coarse crumbs. Gently mix in the egg yolk and 1 tablespoon of cold water, adding a second tablespoon only if needed, until the dough comes together. Form the dough into a disk, wrap it in plastic wrap, and refrigerate for at least 30 minutes to firm up.
2. Preheat the Oven and Prep the Tart Pans
Preheat your oven to 350°F (175°C). Lightly grease a mini tart pan or muffin tin. Once the dough is chilled, roll it out on a lightly floured surface to about ¼-inch thickness. Use a round cutter to cut out circles slightly larger than your tart pan openings. Carefully press the dough into the pans, trimming excess edges, and prick the bottoms with a fork to prevent puffing.
3. Blind Bake the Crusts
Line each tart shell with parchment paper and fill with pie weights, dry beans, or rice. Bake for 10-12 minutes, then remove the weights and parchment and bake for an additional 5-7 minutes until lightly golden. Remove from the oven and let cool slightly while you prepare the filling.
4. Make the Pumpkin Filling
In a medium bowl, combine the pumpkin puree, brown sugar, granulated sugar, eggs, and heavy cream. Mix until smooth. Add cinnamon, nutmeg, ginger, cloves, and vanilla extract, blending well to ensure the spices are evenly distributed. Taste the mixture and adjust sweetness or spice levels as desired.
5. Fill and Bake the Tarts
Pour the pumpkin filling into the pre-baked tart shells, filling each about ¾ full. Return the filled tarts to the oven and bake at 350°F (175°C) for 20-25 minutes, or until the filling is set but still slightly jiggly in the center. Remove from the oven and allow the tarts to cool in the pan for 10 minutes before transferring to a wire rack.
6. Serve and Garnish
Once cooled to room temperature, garnish the Mini Pumpkin Tarts with a dollop of whipped cream, a sprinkle of cinnamon, or a few chopped toasted pecans for added texture and flavor. Serve immediately or refrigerate for up to 3 days for a make-ahead option.
Tips for Perfect Mini Pumpkin Tarts
-
Use Fresh Pumpkin When Possible: Fresh pumpkin puree has a lighter texture and more vibrant flavor than canned, though canned works perfectly in a pinch. Roast a small sugar pumpkin, then puree it for best results.
-
Don’t Overmix the Filling: Overmixing can incorporate too much air, leading to cracks in the filling during baking. Mix until just smooth and combined.
-
Chill the Dough Thoroughly: Cold dough is key for a crisp, flaky crust that holds its shape when baked.
-
Adjust Spice to Taste: The classic pumpkin spice blend can be customized. Add more cinnamon for warmth or extra nutmeg for a robust flavor.
-
Blind Baking is Essential: This step prevents a soggy bottom, ensuring your tarts have a sturdy base for the filling.
Why Mini Pumpkin Tarts Are the Ultimate Fall Dessert
Mini Pumpkin Tarts bring together the best elements of fall baking: the comforting warmth of pumpkin, the subtle heat of spices, and the satisfying crunch of a buttery crust. Their bite-sized form makes them perfect for parties, holiday gatherings, or even an afternoon treat with a cup of coffee or tea. Unlike larger pies, mini tarts are easy to serve and create a visually stunning display when arranged on a platter.
They’re also versatile. You can adjust sweetness levels, swap spices, or even create a crustless version for a lighter option. Their charm lies in the combination of tradition and creativity—honoring the harvest season while allowing for a personal touch in presentation and flavor.
Pairing Ideas
Mini Pumpkin Tarts are delightful on their own, but pairing them with complementary flavors can elevate the experience:
-
Beverages: Warm chai tea, spiced cider, or a rich coffee latte enhance the cozy spices in the filling.
-
Toppings: Fresh whipped cream or a scoop of vanilla ice cream provides a creamy contrast to the dense, spiced filling.
-
Nuts and Seeds: Toasted pecans, walnuts, or pumpkin seeds add a satisfying crunch.
-
Chocolate Drizzle: For a decadent twist, drizzle a small amount of melted dark chocolate over the top before serving.
Storage and Make-Ahead Tips
Mini Pumpkin Tarts are perfect for preparing ahead of time. Here’s how to store them:
-
Room Temperature: Store in an airtight container for up to 24 hours. Ideal if you plan to serve them the same day.
-
Refrigerator: Keep in an airtight container for 2-3 days. Bring to room temperature before serving for optimal flavor.
-
Freezer: Individually wrap cooled tarts in plastic wrap, then place in a freezer-safe bag or container for up to 1 month. Thaw in the refrigerator before serving and top with fresh garnishes.
Make-ahead tarts are a lifesaver during the busy holiday season. You can prepare the crust and filling a day in advance, then assemble and bake just before serving for maximum freshness.
Fun Variations to Try
-
Maple Pumpkin Tarts: Substitute half of the sugar with pure maple syrup for a deeper, caramel-like flavor.
-
Coconut Crust: Replace some of the flour with shredded coconut for a subtle tropical twist.
-
Mini Pumpkin Cheesecakes: Swirl in a cheesecake mixture with the pumpkin filling for a creamy, decadent treat.
-
Savory Pumpkin Tarts: Add a pinch of salt and a sprinkle of parmesan for a unique appetizer version.
Experimenting with these variations allows you to personalize the recipe while keeping the essence of pumpkin and fall spices intact.
The Joy of Baking Mini Pumpkin Tarts
Baking is not just about creating a dessert; it’s an experience. Making Mini Pumpkin Tarts can be a calming, mindful activity that fills your kitchen with warmth and wonderful aromas. It’s an opportunity to connect with seasonal traditions, enjoy the tactile satisfaction of working with dough, and create a dessert that delights both the eyes and taste buds.
These tarts also make thoughtful gifts. Arrange them in a decorative box with parchment paper and a ribbon, and you have a homemade treat that friends, neighbors, or family will treasure. Their charming appearance and comforting flavors make them more than just a dessert—they’re a celebration of fall, harvest, and togetherness.
Frequently Asked Questions (FAQs)
1. Can I use canned pumpkin puree instead of fresh?
Yes, canned pumpkin puree works wonderfully in Mini Pumpkin Tarts. It provides a smooth, consistent texture that’s easy to blend with the other ingredients. When selecting canned pumpkin, make sure to choose plain pumpkin puree rather than pumpkin pie filling. Pumpkin pie filling is already sweetened and spiced, which can throw off the balance of flavors in your tarts. Using plain pumpkin puree allows you to control the sweetness and spices precisely, ensuring that each tart has the perfect warm, spiced flavor. If you want to use fresh pumpkin, a small sugar pumpkin works best—simply roast it until tender and then puree it in a food processor. Fresh pumpkin offers a lighter, more vibrant flavor, though canned pumpkin is a convenient and reliable alternative that delivers excellent results.
2. Can I make these gluten-free?
Absolutely! Mini Pumpkin Tarts can easily be adapted to a gluten-free diet. To make the crust gluten-free, substitute the all-purpose flour with a gluten-free flour blend that is suitable for baking. Many commercial blends work well and provide a similar texture to traditional flour. You may also add a small amount of xanthan gum if your blend does not already include it, as this helps provide structure and prevents crumbling. When making gluten-free tarts, handle the dough gently and avoid overmixing to maintain a tender, flaky crust. The filling itself is naturally gluten-free, so no additional modifications are necessary beyond the crust.
3. Can I freeze the tarts?
Yes, freezing Mini Pumpkin Tarts is a great way to make them ahead of time. Start by baking and cooling the tarts completely. Once cooled, wrap each tart individually in plastic wrap or aluminum foil, then place them in a freezer-safe container or bag. They can be stored in the freezer for up to one month without losing flavor or texture. When ready to serve, thaw the tarts in the refrigerator for a few hours or overnight. To refresh the crust’s texture, you can briefly warm them in a preheated oven at 325°F (160°C) for 5–10 minutes. This makes them ideal for holiday planning or busy weeknight treats.
4. How do I prevent cracks in the filling?
Cracks in pumpkin tart filling are often caused by overmixing or overbaking. To prevent this, mix the filling ingredients just until smooth—avoid whisking excessively, which can incorporate too much air. Bake at the recommended temperature and avoid opening the oven door frequently, as sudden temperature changes can cause cracking. A slight jiggle in the center of the tarts is normal and indicates that the filling is set. As the tarts cool, the filling will firm up beautifully, giving you a smooth, creamy texture without cracks.
Mini Pumpkin Tarts Recipe
- Total Time: 1 hour 15 minutes
- Yield: 12 mini tarts 1x
Description
Mini Pumpkin Tarts are the perfect bite-sized dessert to celebrate the flavors of fall. With a buttery, flaky crust and a creamy, spiced pumpkin filling, these tarts are ideal for cozy evenings, festive gatherings, or holiday dessert tables. Their charming size and comforting flavors make them a favorite for both kids and adults, while their warm spices evoke the essence of autumn. Whether you’re baking for friends, family, or just yourself, these tarts are sure to delight.
Ingredients
For the Crust:
-
1 ½ cups all-purpose flour
-
½ cup powdered sugar
-
¼ teaspoon salt
-
½ cup unsalted butter, chilled and cubed
-
1 large egg yolk
-
1–2 tablespoons cold water
For the Pumpkin Filling:
-
1 cup pumpkin puree (fresh or canned)
-
½ cup brown sugar
-
¼ cup granulated sugar
-
2 large eggs
-
½ cup heavy cream
-
½ teaspoon ground cinnamon
-
¼ teaspoon ground nutmeg
-
¼ teaspoon ground ginger
-
⅛ teaspoon ground cloves
-
½ teaspoon vanilla extract
For Garnish (Optional):
-
Whipped cream
-
Chopped toasted pecans
-
A sprinkle of cinnamon or nutmeg
Instructions
-
Combine flour, powdered sugar, and salt in a large mixing bowl. Cut in chilled butter until mixture resembles coarse crumbs.
-
Mix in egg yolk and cold water, adding a second tablespoon if needed, until dough comes together. Form into a disk, wrap in plastic, and refrigerate for at least 30 minutes.
-
Preheat oven to 350°F (175°C). Lightly grease mini tart pans or a muffin tin.
-
Roll dough to ¼-inch thickness and cut circles slightly larger than tart pan openings. Press dough into pans and prick bottoms with a fork.
-
Blind bake: line each tart shell with parchment and fill with pie weights. Bake 10-12 minutes, remove weights, and bake an additional 5-7 minutes until lightly golden. Cool slightly.
-
In a bowl, combine pumpkin puree, sugars, eggs, and cream. Stir in cinnamon, nutmeg, ginger, cloves, and vanilla. Mix until smooth.
-
Fill pre-baked tart shells about ¾ full with pumpkin mixture. Bake at 350°F (175°C) for 20-25 minutes, until filling is set but slightly jiggly. Cool in pan for 10 minutes, then transfer to a wire rack.
-
Garnish with whipped cream, toasted pecans, or a sprinkle of cinnamon before serving.
Notes
-
Use plain pumpkin puree, not pie filling, for best results.
-
Dough should be chilled to ensure a crisp, flaky crust.
-
Slight jiggle in the filling center is normal; it will firm as it cools.
-
Make-ahead tip: Assemble tarts ahead and refrigerate before baking for convenience.
- Prep Time: 30 minutes
- Cook Time: 45 minutes


