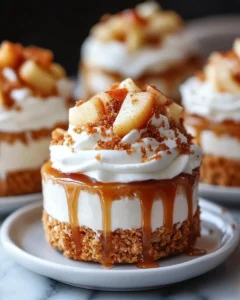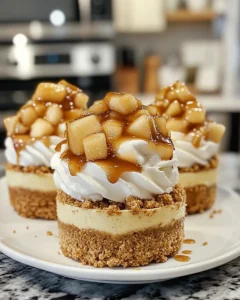
There’s something truly magical about the combination of tart apples, creamy cheesecake, and rich caramel. These Caramel Apple Cheesecake Cups bring that comforting flavor trio together in a perfectly portioned dessert that’s both elegant and easy to enjoy. Whether you’re hosting a cozy autumn gathering, preparing treats for Thanksgiving, or just craving a little something sweet on a chilly evening, these cups deliver a delightful blend of seasonal warmth and creamy indulgence.
The inspiration for this recipe comes from classic caramel apples often enjoyed at fall fairs and family celebrations. But instead of the sticky mess of traditional caramel apples, this version turns those nostalgic flavors into a smooth, decadent cheesecake dessert. With buttery graham cracker crusts, luscious cream cheese filling, tender cinnamon-spiced apples, and a glossy drizzle of caramel, these cheesecake cups are the perfect way to bring fall’s finest flavors to your table—no fork fights required.
Why You’ll Love These Caramel Apple Cheesecake Cups
These cheesecake cups are the ultimate crowd-pleaser. Not only are they stunning to look at, but they’re also incredibly convenient for parties and gatherings. You get all the flavor and satisfaction of a traditional cheesecake without the hassle of slicing and serving. Each cup is a personal treat layered with contrasting textures—the crunch of the crust, the creamy filling, and the soft, caramel-coated apples.
They’re also a wonderful make-ahead dessert. You can prepare them the night before and refrigerate them until serving, which makes them ideal for busy holidays or family dinners. Plus, the single-serve format keeps things neat and elegant. Whether you’re making them for a bake sale, potluck, or just to satisfy your own sweet tooth, these cheesecake cups are sure to impress.
Ingredients
For the Crust
-
1 ½ cups graham cracker crumbs
-
¼ cup granulated sugar
-
6 tablespoons unsalted butter, melted
For the Cheesecake Filling
-
16 oz (2 blocks) cream cheese, softened
-
½ cup granulated sugar
-
1 teaspoon pure vanilla extract
-
2 large eggs
-
½ cup sour cream
For the Apple Topping
-
2 medium apples (Granny Smith or Honeycrisp), peeled, cored, and diced
-
2 tablespoons unsalted butter
-
2 tablespoons brown sugar
-
1 teaspoon cinnamon
-
½ teaspoon nutmeg
For the Caramel Sauce
-
½ cup caramel sauce (store-bought or homemade)
Optional Garnishes
-
Whipped cream
-
Extra caramel drizzle
-
Crushed graham crackers or chopped nuts
Directions
-
Preheat and Prepare:
Preheat your oven to 325°F (163°C). Line a 12-cup muffin tin with paper liners. This will make it easy to remove the cheesecakes once baked. -
Make the Crust:
In a medium bowl, combine the graham cracker crumbs and sugar. Stir in the melted butter until the mixture resembles wet sand. Scoop about 1 ½ tablespoons of the crust mixture into each muffin cup and press it firmly into the bottom. Bake for 5–7 minutes, then remove from the oven and let cool slightly. -
Prepare the Cheesecake Filling:
In a large mixing bowl, beat the softened cream cheese and sugar until smooth and creamy. Add the vanilla extract and mix again. Beat in the eggs one at a time, followed by the sour cream. Scrape down the sides of the bowl as needed to ensure everything is evenly blended. -
Fill the Cups:
Divide the cheesecake batter evenly among the prepared muffin cups, filling each about ¾ full. -
Bake:
Bake for 18–20 minutes, or until the centers are just set and slightly jiggly. Remove from the oven and let cool in the pan for about 15 minutes before transferring to a wire rack to cool completely. Refrigerate for at least 2 hours or overnight to let the cheesecakes firm up. -
Prepare the Apple Topping:
In a small skillet, melt the butter over medium heat. Add the diced apples, brown sugar, cinnamon, and nutmeg. Cook for 6–8 minutes, stirring occasionally, until the apples are tender and coated in a syrupy glaze. Remove from heat and let cool completely. -
Assemble the Cheesecake Cups:
Once the cheesecakes and apple mixture are cool, spoon a generous portion of the apples on top of each cheesecake cup. Drizzle with caramel sauce right before serving. -
Optional Garnishes:
Top with a swirl of whipped cream, an extra drizzle of caramel, and a sprinkle of crushed graham crackers or nuts for added texture and presentation.
Tips for Perfect Cheesecake Cups
-
Room Temperature Ingredients: Make sure your cream cheese, eggs, and sour cream are at room temperature before mixing. This ensures a smooth, lump-free filling.
-
Don’t Overbake: The cheesecakes should still have a slight wobble in the center when you remove them from the oven. They’ll firm up as they cool.
-
Cool Slowly: Letting them cool at room temperature before chilling helps prevent cracks.
-
Use the Right Apples: Tart apples like Granny Smith balance the sweetness of the caramel beautifully, but you can also use Honeycrisp or Fuji for a milder flavor.
-
Homemade Caramel: If you have time, make your own caramel sauce for the richest flavor.
Serving Suggestions
These Caramel Apple Cheesecake Cups are a versatile dessert for almost any occasion. Serve them chilled straight from the fridge for a refreshing treat, or let them sit at room temperature for a few minutes to enhance their creamy texture.
For an elevated presentation, place each cheesecake cup on a small dessert plate, drizzle with extra caramel, and add a dollop of whipped cream. A sprinkle of cinnamon or a thin apple slice as garnish gives them that extra bakery-style touch.
They pair wonderfully with a cup of hot coffee, tea, or apple cider—making them a comforting dessert for crisp autumn afternoons or cozy evenings with family.
Storage and Make-Ahead Instructions
These cheesecake cups are as practical as they are delicious.
-
Refrigerate: Store in an airtight container in the refrigerator for up to 5 days.
-
Freeze: If you want to make them ahead for a future event, freeze the plain cheesecake cups (without topping) for up to 2 months. Thaw overnight in the refrigerator before adding the apple topping and caramel.
-
Make Ahead: You can prepare each component separately. Bake the cheesecakes a day before serving, cook the apple topping in advance, and assemble them fresh before your event for the best texture and flavor.
Variations
-
Mini Jars: For a charming presentation, layer the crust, cheesecake, apples, and caramel in small mason jars. These make adorable gifts or party favors.
-
No-Bake Option: Use a no-bake cheesecake base if you’re short on time. Simply skip baking and refrigerate until set.
-
Apple Pie Twist: Add a spoonful of apple pie filling instead of fresh apples for a shortcut version.
-
Spiced Caramel: Stir a pinch of cinnamon or sea salt into the caramel sauce for extra depth.
-
Cookie Crust: Swap the graham crackers for crushed gingersnaps or vanilla wafers for a unique flavor profile.
Nutritional Information (Approximate per Cup)
-
Calories: 320
-
Fat: 20g
-
Saturated Fat: 12g
-
Carbohydrates: 32g
-
Sugar: 25g
-
Protein: 4g
Note: Nutritional values will vary based on specific ingredients and portion sizes.
How to Make Homemade Caramel Sauce
If you’d like to elevate this recipe even more, making your own caramel sauce is surprisingly simple. Here’s how:
Ingredients:
-
1 cup granulated sugar
-
6 tablespoons unsalted butter
-
½ cup heavy cream
-
Pinch of salt
Instructions:
-
Heat the sugar in a medium saucepan over medium heat, stirring constantly until it melts into an amber liquid.
-
Add the butter carefully (it will bubble up) and stir until combined.
-
Slowly pour in the cream while stirring continuously.
-
Remove from heat and stir in the salt.
-
Let cool before drizzling over your cheesecake cups.
This sauce keeps well in the refrigerator for up to two weeks and can be used on everything from pancakes to ice cream.
Perfect for Every Occasion
These Caramel Apple Cheesecake Cups fit effortlessly into nearly any event. Their individual servings make them easy to transport and share, whether it’s a fall picnic, family reunion, or dessert buffet. They’re also a fantastic choice for Thanksgiving or Christmas gatherings when you want to serve something elegant yet easy to prepare in advance.
Even beyond the holidays, they’re a great pick for birthdays, brunches, or just a weekend baking session when you want to treat yourself. The warm, buttery apple topping and creamy cheesecake base provide a comforting bite that feels like a hug in dessert form.
Frequently Asked Questions
1. Can I make these cheesecake cups without a muffin tin?
Yes, you absolutely can! While muffin tins make portioning and baking convenient, you can easily adapt this recipe for other containers. Small ramekins, heatproof glass jars, or mini dessert cups work wonderfully as alternatives. If you’re using larger ramekins or jars, keep in mind that the baking time may need to be adjusted—typically adding an extra 5–10 minutes to ensure the centers are set but still slightly jiggly. Always use the “wobble test”: gently shake the container, and if the cheesecake jiggles just a bit in the middle, it’s done. Allow them to cool completely before chilling in the refrigerator. These versions are especially charming for parties since they can be served directly in the containers, creating an elegant presentation without needing to remove liners or plates.
2. Can I use a store-bought caramel sauce?
Absolutely! A good-quality store-bought caramel sauce saves time and tastes great, especially when you’re preparing for a busy holiday or event. However, to enhance its flavor and make it taste more homemade, consider warming it slightly with a small knob of butter and a pinch of sea salt before drizzling. This simple step deepens the caramel flavor and adds a touch of richness. If you prefer a thicker drizzle, you can reduce the caramel over low heat for a few minutes to let it thicken. On the other hand, if you want a lighter, glossier finish, mix in a tablespoon of cream while warming it. The goal is to complement, not overpower, the sweet-spiced apples and creamy cheesecake beneath.
3. What type of apples are best for this recipe?
Granny Smith apples are the top choice for these cheesecake cups. Their tart, crisp flavor beautifully balances the sweetness of the caramel and cheesecake layers. If you prefer a milder sweetness, Honeycrisp, Braeburn, or Fuji apples are fantastic options as well. These varieties hold their shape during cooking and add a lovely natural sweetness. Avoid overly soft apples like Red Delicious, which can become mushy when cooked. Mixing two types of apples—one tart and one sweet—can also create a more complex flavor profile. The apples should be diced evenly so they cook uniformly, allowing the warm spices and brown sugar to coat each piece perfectly.
4. Can I make these ahead for a party?
Yes, and that’s one of the best things about this recipe! These cheesecake cups are perfect for advance preparation. You can bake the cheesecake bases up to two days ahead and refrigerate them until needed. The apple topping can also be cooked a day in advance and stored separately in an airtight container. When you’re ready to serve, simply spoon the apple mixture over the chilled cheesecakes and finish with a drizzle of caramel sauce. This method keeps the texture of each component at its best—the crust remains crisp, the filling creamy, and the topping fresh. If you’re hosting a large gathering, this make-ahead feature will save you stress and ensure your desserts look and taste bakery-fresh when it’s time to serve.
Caramel Apple Cheesecake Cups Recipe
- Total Time: 45 minutes (plus chilling time)
- Yield: 12 cheesecake cups 1x
Description
A cozy fall dessert that combines creamy cheesecake, cinnamon-spiced apples, and rich caramel sauce, all layered into perfectly portioned cups. These mini cheesecakes are the ultimate make-ahead treat for holidays, family gatherings, or when you just want to indulge in something sweet and seasonal.
Ingredients
For the Crust
-
1 ½ cups graham cracker crumbs
-
¼ cup granulated sugar
-
6 tablespoons unsalted butter, melted
For the Cheesecake Filling
-
16 oz (2 blocks) cream cheese, softened
-
½ cup granulated sugar
-
1 teaspoon vanilla extract
-
2 large eggs
-
½ cup sour cream
For the Apple Topping
-
2 medium apples (Granny Smith or Honeycrisp), peeled, cored, and diced
-
2 tablespoons unsalted butter
-
2 tablespoons brown sugar
-
1 teaspoon cinnamon
-
½ teaspoon nutmeg
For the Caramel Sauce
-
½ cup caramel sauce (store-bought or homemade)
Optional Garnishes
-
Whipped cream
-
Crushed graham crackers or chopped nuts
Instructions
-
Preheat oven to 325°F (163°C). Line a 12-cup muffin tin with paper liners.
-
Combine graham cracker crumbs, sugar, and melted butter. Mix until the texture resembles wet sand. Press about 1 ½ tablespoons of mixture into each liner to form the crust. Bake for 5–7 minutes, then set aside to cool slightly.
-
In a large bowl, beat cream cheese and sugar until smooth. Add vanilla extract, then eggs one at a time, mixing until just combined. Blend in sour cream until creamy.
-
Divide cheesecake batter evenly into the prepared cups, filling each about ¾ full.
-
Bake for 18–20 minutes or until the centers are just set but slightly jiggly. Let cool in the pan for 15 minutes, then transfer to a rack to cool completely. Refrigerate for at least 2 hours.
-
For the topping, melt butter in a skillet over medium heat. Add diced apples, brown sugar, cinnamon, and nutmeg. Cook 6–8 minutes until tender and coated in a syrupy glaze. Let cool.
-
Spoon cooled apples over each chilled cheesecake cup and drizzle with caramel sauce.
-
Top with whipped cream, extra caramel, or crushed nuts if desired.
Notes
For best texture, ensure all ingredients are at room temperature before mixing. Granny Smith apples add a tart contrast to the sweet caramel, but Honeycrisp or Fuji can be used for a milder flavor. These cheesecake cups can be stored in the refrigerator for up to 5 days or frozen (without topping) for up to 2 months. Add the apple topping and caramel drizzle right before serving for the freshest taste and texture.
- Prep Time: 20 minutes
- Cook Time: 25 minutes


