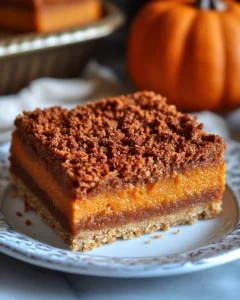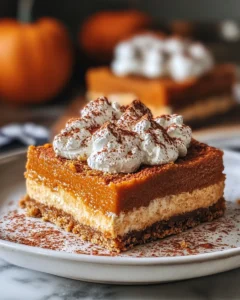
There’s something undeniably magical about fall — the crisp air, cozy sweaters, and, of course, the comforting aroma of pumpkin spice wafting through the kitchen. That’s where Pumpkin Pie Bliss Bars come in. These bars capture all the warm, nostalgic flavors of traditional pumpkin pie but in a fun, easy-to-serve form that’s perfect for gatherings, potlucks, or even a quiet night at home. Inspired by the timeless holiday dessert, these bars are a fusion of creamy pumpkin filling, buttery crust, and a touch of autumn spice in every bite. Whether you’re hosting Thanksgiving dinner, baking for a fall festival, or simply craving a taste of comfort, these bars are a cozy, crowd-pleasing treat that brings the spirit of the season to your table.
Ingredients
For the Crust
-
1 ½ cups graham cracker crumbs (or crushed digestive biscuits)
-
¼ cup brown sugar, packed
-
½ teaspoon ground cinnamon
-
½ cup unsalted butter, melted
For the Pumpkin Layer
-
1 can (15 ounces) pure pumpkin purée
-
¾ cup granulated sugar
-
¼ cup brown sugar, packed
-
2 large eggs
-
1 teaspoon vanilla extract
-
1 ½ teaspoons pumpkin pie spice
-
½ teaspoon ground cinnamon
-
¼ teaspoon salt
-
¾ cup evaporated milk
For the Topping
-
1 ½ cups whipped cream or whipped topping
-
2 tablespoons powdered sugar
-
½ teaspoon vanilla extract
-
Ground cinnamon for dusting (optional)
Directions
1. Preheat and Prepare the Pan
Preheat your oven to 350°F (175°C). Line an 8×8-inch baking dish with parchment paper, leaving a bit of overhang on the sides to make lifting the bars out easier later. Lightly grease the parchment with a bit of butter or nonstick spray.
2. Make the Crust
In a medium mixing bowl, combine the graham cracker crumbs, brown sugar, and cinnamon. Pour in the melted butter and stir until the mixture resembles wet sand. Press the mixture evenly into the bottom of your prepared baking dish, making sure it’s compact and smooth.
Bake the crust for about 10 minutes, just until it begins to set. Remove it from the oven and allow it to cool slightly while preparing the filling.
3. Prepare the Pumpkin Filling
In a large bowl, whisk together the pumpkin purée, granulated sugar, brown sugar, eggs, vanilla extract, pumpkin pie spice, cinnamon, salt, and evaporated milk. Mix until smooth and creamy. This filling should be thick but pourable — similar to a traditional pumpkin pie batter.
4. Assemble and Bake
Pour the pumpkin filling evenly over the baked crust. Tap the pan gently on the counter to remove any air bubbles and ensure an even layer.
Bake for 40–45 minutes, or until the center is set but still slightly jiggles when you gently shake the pan. The edges should be firm and slightly golden.
5. Cool Completely
Remove the pan from the oven and allow the bars to cool at room temperature for about 1 hour. Then transfer them to the refrigerator and chill for at least 2–3 hours, or until fully set. This chilling step is key to getting clean, firm slices that hold their shape.
6. Prepare the Whipped Topping
While the bars are chilling, prepare the whipped topping. In a large bowl, use an electric mixer to beat the whipped cream, powdered sugar, and vanilla extract until soft peaks form. Keep the whipped topping chilled until ready to use.
7. Slice and Serve
Once the bars are fully chilled, lift them out of the pan using the parchment paper overhang. Slice into even squares or rectangles. Spread or pipe the whipped topping over each bar and dust lightly with ground cinnamon if desired.
Serve cold for a creamy, dreamy fall dessert experience that’s as elegant as it is comforting.
Prep Time, Cook Time, Total Time, Yield
Prep Time: 20 minutes
Cook Time: 45 minutes
Total Time: About 3 hours (including chilling)
Yield: 12 bars
Notes
-
Graham Cracker Substitute: If you don’t have graham crackers, crushed shortbread or digestive biscuits work beautifully.
-
Make Ahead: These bars can be made a day in advance. In fact, they taste even better the next day as the flavors meld together.
-
Storage: Store covered in the refrigerator for up to 4 days. Avoid freezing once topped with whipped cream; instead, freeze the plain pumpkin layer and thaw before serving.
-
Topping Options: Try cream cheese frosting for a richer twist or a drizzle of caramel sauce for extra indulgence.
Why You’ll Love Pumpkin Pie Bliss Bars
1. Effortless Elegance
Unlike traditional pumpkin pie, these bars require no rolling, crimping, or delicate handling. The press-in crust makes the process foolproof, and the layered presentation gives it a polished, bakery-style look that impresses every time.
2. Perfect for Sharing
Their portable, sliceable form makes these bars ideal for potlucks, office gatherings, and bake sales. You can easily transport them without worrying about cracks or spillage — a major bonus for busy bakers.
3. All the Fall Flavor You Crave
Every bite is filled with cozy pumpkin goodness and hints of cinnamon, nutmeg, and vanilla — just the right amount of sweetness to satisfy dessert lovers while keeping it light and balanced.
4. Crowd-Pleasing Texture
The buttery crust provides a subtle crunch that complements the creamy pumpkin layer, creating a satisfying contrast. It’s like having the best of both worlds — pie and cheesecake in one comforting bite.
The Inspiration Behind Pumpkin Pie Bliss Bars
The idea for these Pumpkin Pie Bliss Bars came from the desire to simplify a holiday favorite without losing its nostalgic charm. Traditional pumpkin pie is a staple on many tables, but it often demands more time and precision than busy schedules allow. These bars offer that same heartwarming flavor in an easy, hand-held version — no pie dish required.
The inspiration traces back to cozy autumn weekends spent baking in the kitchen, when the scent of pumpkin spice filled the air and family gathered around waiting for a taste of something sweet. It’s a recipe born from tradition but adapted for modern life — approachable, foolproof, and endlessly comforting.
Tips for Perfect Pumpkin Pie Bliss Bars
-
Use Pure Pumpkin Purée, Not Pie Filling
Pumpkin pie filling already contains spices and sweeteners, which can throw off the flavor balance. Stick to pure pumpkin purée for full control over sweetness and spice. -
Don’t Skip the Cooling Time
Allowing the bars to cool completely is essential. If you slice them while still warm, the filling may not hold its shape. Patience pays off — chilled bars have the perfect firm-yet-creamy texture. -
Spice It Your Way
Love extra spice? Add a pinch of cloves or ginger for a stronger autumn kick. Prefer it milder? Reduce the pumpkin pie spice slightly for a more subtle flavor. -
Make It Gluten-Free
Swap the graham crackers for gluten-free cookie crumbs, and you’ll have a dessert everyone can enjoy. -
Serving Suggestion
For an elevated presentation, serve each bar with a dollop of whipped topping and a sprinkle of crushed graham crackers or toasted pecans.
How to Store and Freeze
To Store:
Keep your Pumpkin Pie Bliss Bars covered in the refrigerator for up to 4 days. Store without the whipped topping for best texture, and add it right before serving.
To Freeze:
Wrap the un-topped bars tightly in plastic wrap and place them in an airtight container. Freeze for up to 2 months. Thaw overnight in the refrigerator before serving and add fresh whipped cream on top.
Variations to Try
1. Pumpkin Cheesecake Bars
Add a swirl of cream cheese filling for an extra layer of richness. Simply beat together 4 ounces of softened cream cheese, ¼ cup sugar, and 1 egg yolk, then swirl into the pumpkin layer before baking.
2. Maple Pumpkin Bars
Replace part of the sugar with pure maple syrup for a naturally sweet twist with deep caramel notes.
3. Nutty Pumpkin Bars
Add a crunchy element by sprinkling chopped pecans or walnuts over the crust before pouring the pumpkin filling.
4. Chocolate Pumpkin Bars
For a fun spin, mix a handful of mini chocolate chips into the crust or drizzle melted chocolate over the finished bars.
5. Dairy-Free Version
Use coconut milk instead of evaporated milk and plant-based butter for a dairy-free dessert that still tastes luxurious.
Serving Ideas
These bars shine on their own, but they also pair wonderfully with:
-
A warm cup of coffee or spiced chai
-
A drizzle of caramel or maple glaze
-
A scoop of vanilla ice cream for extra indulgence
-
A sprinkle of crushed nuts for added crunch
Whether served as a Thanksgiving dessert or a sweet treat after dinner, they bring comfort and joy to every bite.
Frequently Asked Questions
1. Can I use homemade pumpkin purée instead of canned?
Yes, you can absolutely use homemade pumpkin purée for this recipe. It often gives the bars a richer, fresher flavor compared to the canned version. However, the key is to make sure your purée is thick and well-drained. Homemade pumpkin tends to contain more water, which can make the filling too soft or prevent it from setting properly. To fix this, strain your purée using cheesecloth or paper towels to remove excess moisture. Once it’s thick and smooth, measure it just as you would canned pumpkin. The flavor payoff is worth the extra step.
2. How do I know when the bars are fully baked?
You’ll know your Pumpkin Pie Bliss Bars are ready when the edges are firm and slightly golden while the center has a gentle jiggle when you move the pan. This slight wobble means the filling is set but still creamy. If the center looks too wet or shiny, bake for an additional 5–10 minutes, checking frequently. Remember, the bars continue to firm up as they cool, so avoid overbaking, which can lead to cracks or a dry texture.
3. Can I make these bars ahead of time?
Definitely. These bars are one of the best make-ahead desserts for busy holidays or gatherings. Bake them a day or two in advance and store them covered in the refrigerator. The chilling time actually enhances the flavor and texture. Just hold off on adding the whipped topping until shortly before serving to keep the presentation fresh and creamy.
4. What’s the best way to cut clean slices?
For professional-looking slices, use a sharp knife and wipe it clean between each cut. Chilling the bars overnight helps them hold their shape, ensuring each piece comes out smooth and picture-perfect. For extra precision, use a long chef’s knife and cut in one motion rather than sawing back and forth.
Print
Pumpkin Pie Bliss Bars Recipe
- Total Time: About 3 hours (including chilling)
- Yield: 12 bars 1x
Description
There’s something magical about the fall season — crisp air, cozy gatherings, and the warm scent of pumpkin spice drifting from the oven. These Pumpkin Pie Bliss Bars capture that nostalgic comfort in every bite. With a buttery graham cracker crust, creamy pumpkin filling, and a soft whipped topping, they bring all the classic flavors of pumpkin pie in a simpler, more shareable form. Perfect for Thanksgiving, fall potlucks, or quiet evenings by the fire, these bars are an irresistible treat that combines the best of both worlds — homemade taste and easy preparation.
Ingredients
For the Crust
-
1 ½ cups graham cracker crumbs (or crushed digestive biscuits)
-
¼ cup brown sugar, packed
-
½ teaspoon ground cinnamon
-
½ cup unsalted butter, melted
For the Pumpkin Layer
-
1 can (15 ounces) pure pumpkin purée
-
¾ cup granulated sugar
-
¼ cup brown sugar, packed
-
2 large eggs
-
1 teaspoon vanilla extract
-
1 ½ teaspoons pumpkin pie spice
-
½ teaspoon ground cinnamon
-
¼ teaspoon salt
-
¾ cup evaporated milk
For the Topping
-
1 ½ cups whipped cream or whipped topping
-
2 tablespoons powdered sugar
-
½ teaspoon vanilla extract
-
Ground cinnamon for dusting (optional)
Instructions
-
Preheat oven to 350°F (175°C). Line an 8×8-inch baking pan with parchment paper and lightly grease it.
-
In a medium bowl, combine graham cracker crumbs, brown sugar, and cinnamon. Stir in melted butter until evenly moistened. Press mixture firmly into the prepared pan to form an even crust.
-
Bake the crust for 10 minutes, then remove from oven and let it cool slightly.
-
In a large bowl, whisk together pumpkin purée, granulated sugar, brown sugar, eggs, vanilla, pumpkin pie spice, cinnamon, salt, and evaporated milk until smooth and creamy.
-
Pour the pumpkin filling over the crust, spreading evenly. Tap the pan gently to remove air bubbles.
-
Bake for 40–45 minutes or until the edges are firm and the center has a slight jiggle when moved.
-
Allow bars to cool at room temperature for 1 hour, then refrigerate for at least 2–3 hours or until set.
-
In a separate bowl, whip the cream with powdered sugar and vanilla extract until soft peaks form. Keep chilled until ready to use.
-
Once the bars are completely chilled, lift them from the pan using the parchment paper and slice into squares. Top with whipped cream and a light dusting of cinnamon before serving.
Notes
- Prep Time: 20 minutes
- Cook Time: 45 minutes


