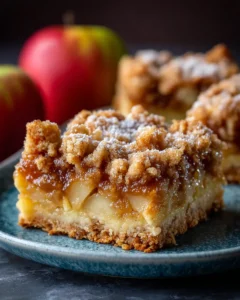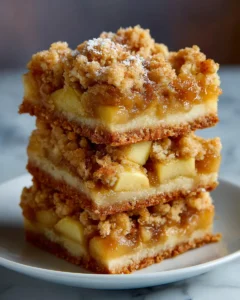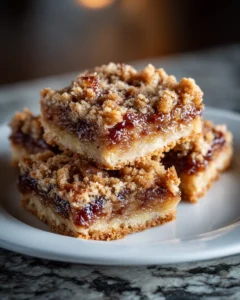
There’s something undeniably comforting about the smell of baked apples mingling with cinnamon and brown sugar. Apple crumble bars capture this warmth in every bite—a perfect balance of soft, tender apple filling and a buttery, crumbly topping that melts in your mouth. Whether you’re looking for a sweet treat for a cozy evening at home, a festive addition to a holiday table, or a delightful dessert for a summer picnic, these bars are versatile enough to fit any occasion.
The inspiration for this recipe comes from a cherished family tradition. Growing up, weekends meant the aroma of fresh apples, cinnamon, and buttery crust wafting through the house. My grandmother would often bake apple desserts, from pies to crumbles, and the crumble bars quickly became a favorite because of their simplicity and ease of sharing. Unlike a traditional pie, these bars are easy to cut, transport, and serve, making them perfect for gatherings, potlucks, or simply enjoying with a cup of tea on a quiet afternoon.
Apple crumble bars are more than just dessert—they’re a celebration of autumnal flavors, homey nostalgia, and the joy of baking from scratch. The combination of tart, juicy apples and a sweet, crumbly topping is irresistible, offering layers of texture and flavor that appeal to kids and adults alike. Plus, this recipe is flexible: you can experiment with different apple varieties, spices, or even add nuts to the crumble for extra crunch.
In this article, we’ll walk you through every step of making perfect apple crumble bars, share insider tips to elevate your baking game, and provide creative serving ideas. Whether you’re a beginner baker or a seasoned pro, this recipe is designed to inspire confidence and creativity in the kitchen, making it a go-to treat for years to come.
Ingredients for Apple Crumble Bars
To create the perfect apple crumble bars, you’ll need a combination of simple pantry staples and fresh ingredients. Here’s what you’ll need:
For the Crust and Crumble Topping:
-
2 ½ cups all-purpose flour
-
1 teaspoon baking powder
-
½ teaspoon salt
-
¾ cup unsalted butter, chilled and cut into cubes
-
1 cup granulated sugar
-
1 large egg
-
1 teaspoon vanilla extract
For the Apple Filling:
-
4–5 medium apples (Granny Smith, Honeycrisp, or a mix), peeled, cored, and chopped
-
¼ cup granulated sugar
-
¼ cup brown sugar, packed
-
1 teaspoon ground cinnamon
-
¼ teaspoon ground nutmeg
-
1 teaspoon lemon juice
-
1 tablespoon all-purpose flour
Optional Additions:
-
½ cup chopped walnuts or pecans
-
¼ teaspoon ground ginger for added spice
-
Caramel drizzle for serving
Step-by-Step Instructions
Making apple crumble bars may seem intimidating at first glance, but breaking the process into manageable steps makes it simple, fun, and stress-free. Each stage plays a critical role in achieving the perfect balance of a tender crust, juicy apple filling, and buttery crumble topping. Follow these detailed instructions carefully, and you’ll end up with bars that are both visually appealing and deliciously satisfying.
1. Prepare the Crust
Start by preheating your oven to 350°F (175°C). This ensures the pan and oven are ready by the time your dough is mixed. In a medium-sized bowl, whisk together all-purpose flour, baking powder, and salt. This step not only evenly distributes the leavening agent but also ensures that the salt balances the sweetness of the bars.
In a separate large bowl, use a hand mixer or stand mixer to cream the butter and granulated sugar until the mixture is light and fluffy. This creates a tender base for your bars. Beat in the egg and vanilla extract until fully incorporated. Gradually add the dry flour mixture to the wet ingredients, mixing just until a crumbly dough forms. Avoid overmixing, as this can lead to a tougher crust.
Once your dough is ready, reserve about one-third for the crumble topping. Press the remaining two-thirds firmly and evenly into the bottom of a greased 9×13-inch baking pan. Pressing the dough firmly ensures a solid base that won’t fall apart when slicing the bars later. For an extra even layer, you can use the bottom of a flat measuring cup or your hands to smooth the surface.
2. Prepare the Apple Filling
While the crust sets, prepare the apple filling. In a large bowl, combine chopped apples, granulated sugar, brown sugar, cinnamon, nutmeg, lemon juice, and flour. Toss everything together until the apple pieces are evenly coated with the sugar-spice mixture. The flour helps thicken the juices as the bars bake, preventing a soggy filling.
Evenly spread the apple mixture over the prepared crust, making sure it covers the entire surface. Gently press the apples down so they sit nicely on the base but leave enough texture for a juicy, tender bite. This layer forms the heart of the bars, providing the sweet-tart flavor and soft texture that contrasts beautifully with the crunchy crumble topping.
3. Add the Crumble Topping
Take the reserved one-third of the dough and crumble it evenly over the apple layer. If you’re adding nuts such as pecans or walnuts, sprinkle them across the top at this stage. The crumble topping should be distributed loosely to create a rustic, textured look that bakes into a golden, buttery layer. Don’t worry if some apple pieces peek through—the slightly exposed fruit caramelizes beautifully during baking.
4. Bake the Bars
Place the pan in the preheated oven and bake for 45–50 minutes, or until the top is golden brown and the apple filling is bubbling at the edges. The aroma of baked apples and cinnamon will fill your kitchen, signaling that the bars are nearly ready.
Once baked, remove the pan from the oven and allow the bars to cool completely in the pan. This step is essential; cooling lets the filling set and makes slicing easier without the layers sliding apart. Once cooled, use a sharp knife to cut into squares or rectangles, depending on your preference.
Tips for Perfect Apple Crumble Bars
Even a great recipe benefits from a few insider tips:
-
Choose the right apples: Tart apples like Granny Smith hold their shape better, while sweeter varieties like Honeycrisp add natural sweetness. Mixing types can give you the perfect balance.
-
Don’t overmix the dough: Overmixing can lead to a tough crust. Mix just until the ingredients come together.
-
Chill the butter: Cold butter creates a flakier, more tender crumble.
-
Layer evenly: Make sure the apple filling spreads evenly across the crust for consistent bites.
-
Let it cool: Cutting too early can cause the bars to fall apart. Patience pays off.
Serving Suggestions
Apple crumble bars are delicious on their own, but there are several ways to elevate the experience:
-
With ice cream: A scoop of vanilla ice cream adds a creamy contrast to the warm, spiced apples.
-
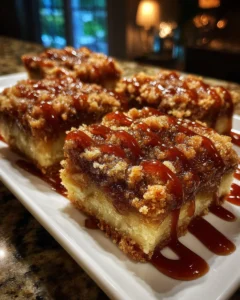
Drizzle with caramel: For a decadent touch, drizzle caramel sauce over the top before serving.
-
Dust with powdered sugar: A light dusting adds elegance for a dessert table.
-
Pair with tea or coffee: Perfect for an afternoon snack or brunch treat.
Storage and Freezing
Proper storage ensures your apple crumble bars stay fresh and delicious:
-
Room temperature: Store in an airtight container for up to 3 days.
-
Refrigerator: Extend freshness to about a week.
-
Freezing: Wrap tightly in plastic wrap and foil, then freeze for up to 3 months. Thaw overnight in the refrigerator and warm slightly before serving.
Creative Variations
Get creative with this versatile recipe:
-
Berry Apple Crumble Bars: Add 1 cup of fresh or frozen berries to the apple filling.
-
Spiced Crumble: Add cardamom, cloves, or ginger to the crumble topping for a holiday twist.
-
Oat Crumble Bars: Replace ½ cup of flour with rolled oats in the topping for added texture.
-
Nutty Delight: Incorporate almonds, pecans, or walnuts into the crumble for a satisfying crunch.
-
Mini Bars: Use a muffin tin to make individual-sized apple crumble bars—perfect for lunchboxes or parties.
Frequently Asked Questions
1. Can I use frozen apples?
Yes, you can use frozen apples, but it’s important to handle them properly to avoid soggy bars. Thaw the apples completely in the refrigerator or under cold running water, then pat them dry with paper towels to remove any excess moisture. This step ensures that the filling will set correctly during baking and prevents the crust from becoming too wet or soft. If the apples release a lot of juice while thawing, you can toss them with a little extra flour to help absorb the liquid. Using frozen apples is a convenient option, especially when fresh apples are out of season, and it still yields a delicious, flavorful result.
2. Can I make these bars ahead of time?
Absolutely! Apple crumble bars are perfect for preparing in advance. You can assemble the bars and store them in the refrigerator for up to two days before baking, which makes them ideal for busy schedules or holiday prep. If you’ve already baked the bars, they can be stored in an airtight container in the refrigerator for 3–5 days. To enjoy the taste and texture of freshly baked bars, warm them slightly in the oven or microwave before serving. Reheating brings back the comforting aroma and soft, tender texture of the apple filling while keeping the crumble topping lightly crisp.
3. What is the best apple for crumble bars?
Choosing the right apple variety is key to achieving the perfect texture and flavor. Tart apples like Granny Smith are ideal because they hold their shape during baking and provide a subtle tang that balances the sweetness of the sugar and crumble. For added complexity, consider mixing tart apples with sweeter varieties like Honeycrisp, Fuji, or Gala. This combination creates a richer flavor profile and ensures a soft, juicy filling without being overly sweet. When selecting apples, aim for firm, crisp fruit that is free of bruises or blemishes for the best results.
4. Can I make these bars gluten-free?
Yes! You can make apple crumble bars gluten-free by substituting the all-purpose flour with a gluten-free flour blend. While the texture may be slightly different—sometimes a bit more crumbly or dense—the flavor remains just as delicious. For best results, choose a blend that contains xanthan gum or another binding agent to help the crust hold together. Additionally, you can experiment with almond flour or oat flour in the crumble topping for a naturally gluten-free option with added texture and flavor.


