27")
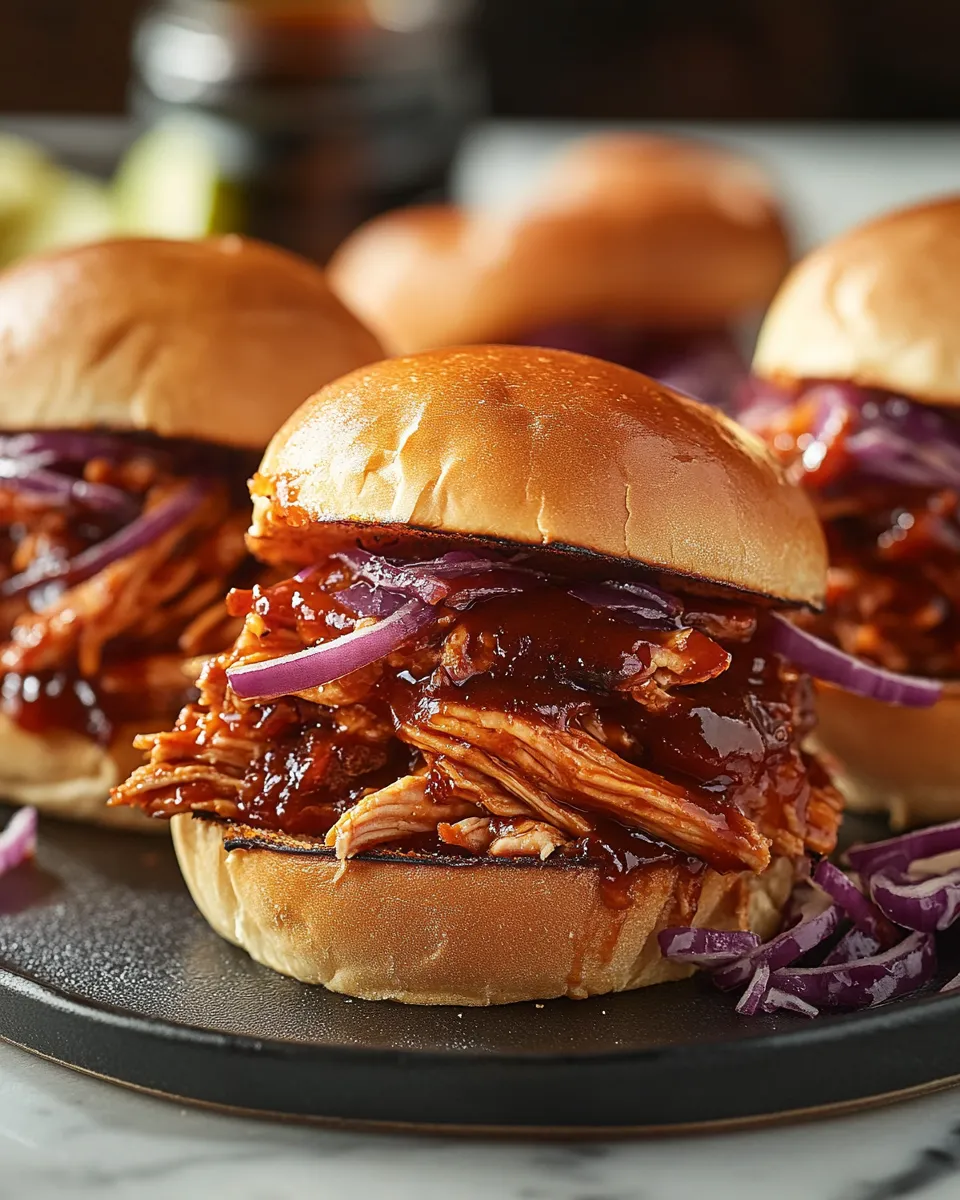
There are certain recipes that instantly bring people together, and these melt-in-your-mouth roast beef sliders are one of them. They’re the kind of dish that feels right at home on a cozy weekend evening, a game-day spread, or a casual family gathering where everyone gravitates toward the kitchen. Warm, savory, and incredibly satisfying, these sliders strike the perfect balance between comfort food and crowd-pleasing convenience.
The inspiration for this recipe comes from those moments when you want something hearty and impressive without spending hours in the kitchen. It’s rooted in classic deli flavors—tender roast beef, soft rolls, and a buttery topping—but elevated just enough to feel special. Over time, this dish has become a go-to for busy nights and celebrations alike, proving that simple ingredients, when treated right, can create something truly memorable.
Why These Roast Beef Sliders Are So Irresistible
What makes these sliders truly unforgettable is the texture and flavor combination. The roast beef becomes incredibly tender as it warms in the oven, soaking up savory juices and melted cheese. The rolls stay soft and pillowy on the inside while turning lightly golden on top, thanks to a brushed-on butter mixture that infuses every bite with rich flavor.
These sliders are also wonderfully adaptable. You can make them mild and kid-friendly or add layers of flavor with caramelized onions, tangy sauces, or a touch of spice. Best of all, they come together quickly, making them ideal for last-minute hosting or stress-free family meals.
Ingredients You’ll Need (With Measurements)
To make these sliders as flavorful and foolproof as possible, stick to quality ingredients and precise measurements.
-
Slider rolls – 12 rolls (soft dinner rolls or sweet-style rolls)
-
Thinly sliced roast beef – 450 g (about 1 lb)
-
Provolone or mozzarella cheese – 12 slices (about 225 g / 8 oz)
-
Unsalted butter – 85 g (6 tablespoons), melted
-
Yellow onion – 1 medium (about 150 g), thinly sliced
-
Olive oil – 1 tablespoon
-
Garlic powder – 1 teaspoon
-
Onion powder – 1 teaspoon
-
Dijon-style mustard – 1 tablespoon
-
Worcestershire-style sauce (non-alcoholic) – 1 tablespoon
-
Sesame seeds (optional) – 1 tablespoon
-
Salt – ½ teaspoon
-
Black pepper – ½ teaspoon
Each ingredient plays a specific role, from the richness of the butter to the savory depth of the roast beef, ensuring that the final result is balanced and deeply satisfying.
 28")
Tips for Melt-In-Your-Mouth Texture
-
Choose thinly sliced roast beef: This allows the meat to heat evenly and stay tender.
-
Don’t skip the foil step: Covering the sliders initially traps steam, preventing the rolls from drying out.
-
Rest before cutting: A short rest ensures clean slices and better texture.
Serving Ideas and Pairings
These sliders are satisfying on their own, but they also pair beautifully with simple sides. Consider serving them with a crisp green salad, oven-roasted potatoes, or a light vegetable slaw. For gatherings, they shine alongside finger foods like baked vegetable wedges or a fresh herb dip.
Frequently Asked Questions
1. Can I make roast beef sliders ahead of time?
Yes, these sliders are an excellent make-ahead option. You can assemble the entire dish up to 24 hours in advance, cover it tightly, and store it in the refrigerator. When you’re ready to bake, let the dish sit at room temperature for about 15 minutes before placing it in the oven. This helps ensure even heating and prevents the baking dish from cracking due to temperature shock. The result is just as melty and flavorful as if you assembled them fresh.
2. What type of roast beef works best for sliders?
Thinly sliced deli-style roast beef works best because it heats quickly and stays tender. Look for slices that are not overly dry and have a bit of natural moisture. If you’re using leftover homemade roast beef, slice it as thinly as possible against the grain. Thicker slices can still work, but they may not achieve the same melt-in-your-mouth texture without additional moisture or sauce.
3. Can I substitute the cheese or add extra fillings?
Absolutely. Provolone and mozzarella are popular because they melt smoothly, but mild cheddar, Swiss-style cheese, or a blend can also be used. For extra fillings, sautéed mushrooms, roasted bell peppers, or even a thin layer of creamy spread can be added. Just be mindful not to overfill the sliders, as too many layers can make them difficult to cut and serve.
4. How do I store and reheat leftovers?
Store leftover sliders in an airtight container in the refrigerator for up to three days. To reheat, place them in a baking dish, cover loosely with foil, and warm in a 160°C (325°F) oven for about 10–12 minutes. This method helps maintain the soft texture of the rolls and prevents the beef from drying out. Avoid microwaving if possible, as it can make the bread chewy.
Final Thoughts
Melt-in-your-mouth roast beef sliders are the kind of recipe that earns a permanent place in your collection. They’re comforting without being heavy, simple without feeling plain, and versatile enough to suit almost any occasion. Whether you’re feeding a hungry family on a busy evening or preparing a dish to share with friends, these sliders deliver consistent, crowd-pleasing results.
What truly sets this recipe apart is how approachable it is. With straightforward ingredients and clear steps, even novice cooks can achieve impressive results. At the same time, more experienced home cooks can easily adapt the recipe, experimenting with flavors and add-ins to make it their own. That flexibility makes it a reliable foundation rather than a one-time novelty.
There’s also something deeply satisfying about pulling a tray of golden, bubbling sliders from the oven and watching everyone’s eyes light up. Food has a way of creating moments, and this dish does exactly that. It invites people to gather, to slow down, and to enjoy something warm and comforting together. Once you try these sliders, chances are they’ll become a requested favorite—one you’ll be happy to make again and again.
Print 29")
Melt-In-Your-Mouth Roast Beef Sliders (So Easy!)
- Total Time: 40 minutes
- Yield: 12 sliders
Description
A comforting, easy-to-make dish featuring tender roast beef, melty cheese, and soft rolls baked with a savory butter topping.
Ingredients
-
Slider rolls – 12 rolls
-
Thinly sliced roast beef – 450 g (1 lb)
-
Provolone or mozzarella cheese – 12 slices (225 g / 8 oz)
-
Unsalted butter – 85 g (6 tablespoons), melted
-
Yellow onion – 1 medium (150 g), thinly sliced
-
Olive oil – 1 tablespoon
-
Garlic powder – 1 teaspoon
-
Onion powder – 1 teaspoon
-
Dijon-style mustard – 1 tablespoon
-
Worcestershire-style sauce (non-alcoholic) – 1 tablespoon
-
Salt – ½ teaspoon
-
Black pepper – ½ teaspoon
-
Sesame seeds (optional) – 1 tablespoon
Instructions
-
Heat olive oil in a skillet and cook the sliced onion until soft and lightly golden.
-
Preheat the oven to 180°C (350°F) and prepare a baking dish.
-
Slice the rolls horizontally and place the bottom half in the dish.
-
Layer roast beef, cooked onions, and cheese evenly over the rolls.
-
Place the top half of the rolls on top.
-
Mix melted butter with garlic powder, onion powder, mustard, Worcestershire-style sauce, salt, and pepper.
-
Brush the butter mixture over the rolls and sprinkle with sesame seeds if desired.
-
Cover with foil and bake for 15 minutes, then uncover and bake for 8–10 minutes until golden.
-
Rest briefly, slice, and serve warm.
Notes
-
Use thinly sliced roast beef for the best texture.
-
Assemble ahead and refrigerate for convenience.
-
Reheat leftovers in the oven for best results.
- Prep Time: 15 minutes
- Cook Time: 25 minutes
 30")